Kombo supports SFTP integrations where your customers can send data to our servers in any format, which we then normalize into our unified model.
Because we accept any file structure as provided by the customer’s system, each integration requires its own mapping configuration.When the first file for an SFTP integration is received, the initial sync will fail because no mappings are set up yet — this is expected.
Our support team is automatically notified and will create the necessary mappings.
Alternatively, you can configure or adjust the mappings yourself using self-serve mapping.
Self-serve mapping is only available for SFTP connections that deliver a
single export file per sync. If your customer’s system exports multiple
files (e.g., separate files for employees, absences, and time off balances),
you will need to contact our support team to set up custom mappings.
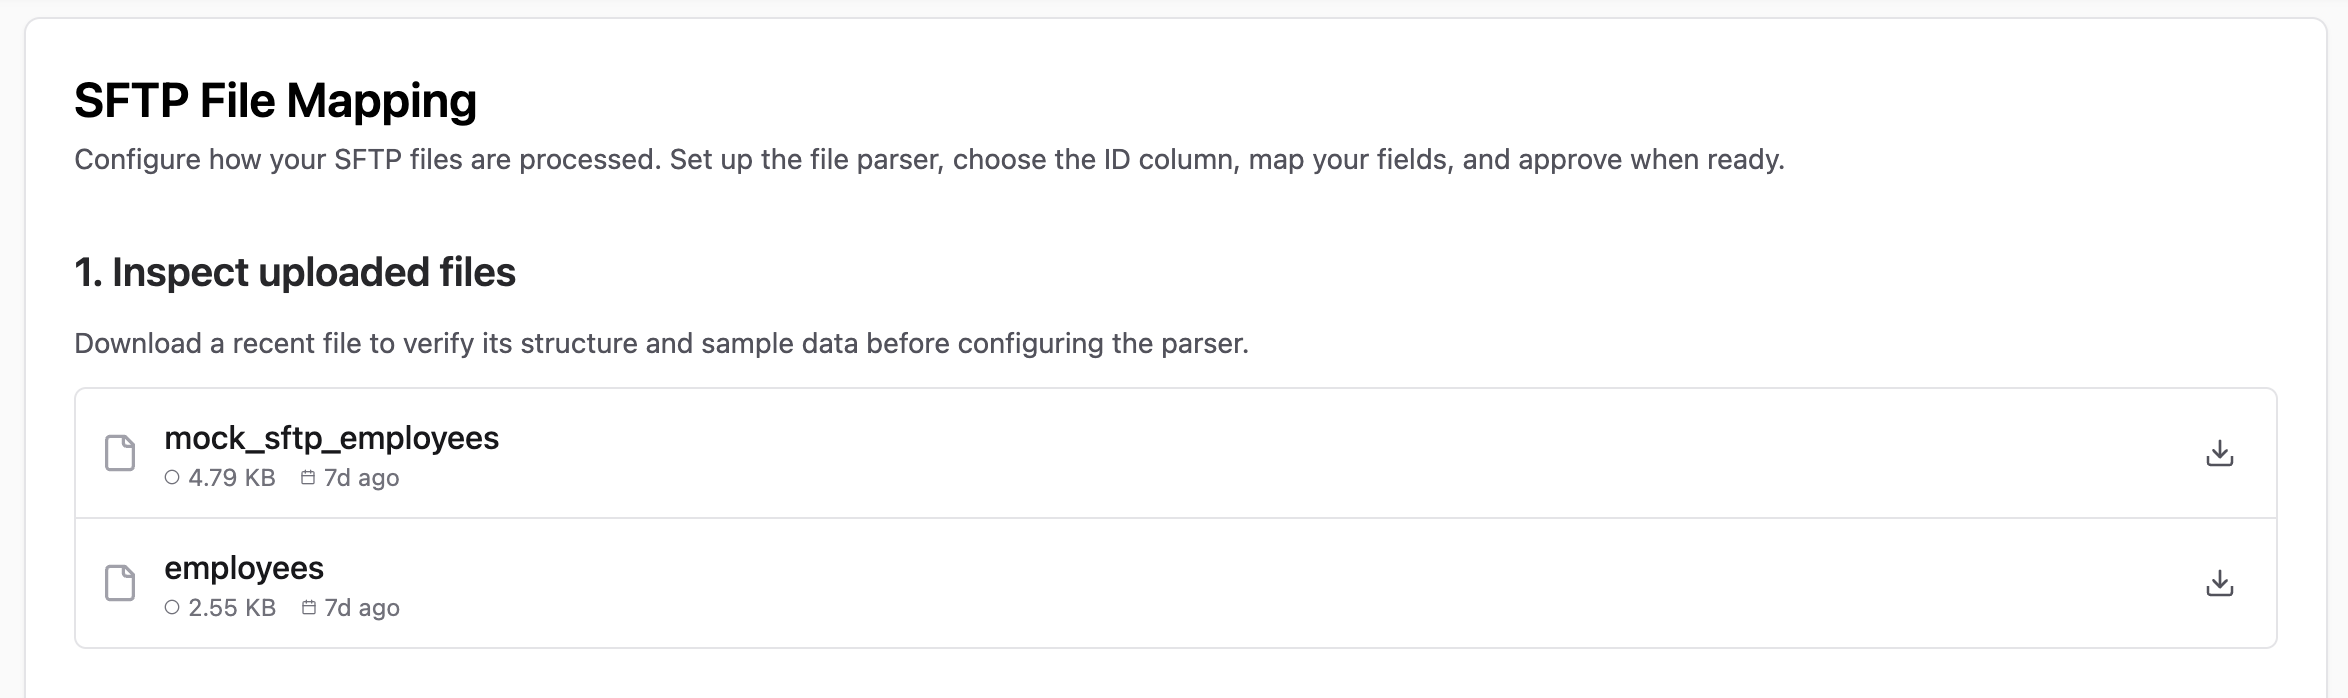
You can view the uploaded files in the Kombo dashboard to review their structure and verify data completeness. Confirm that the exported data meets your expectations before proceeding. This requires admin permissions.
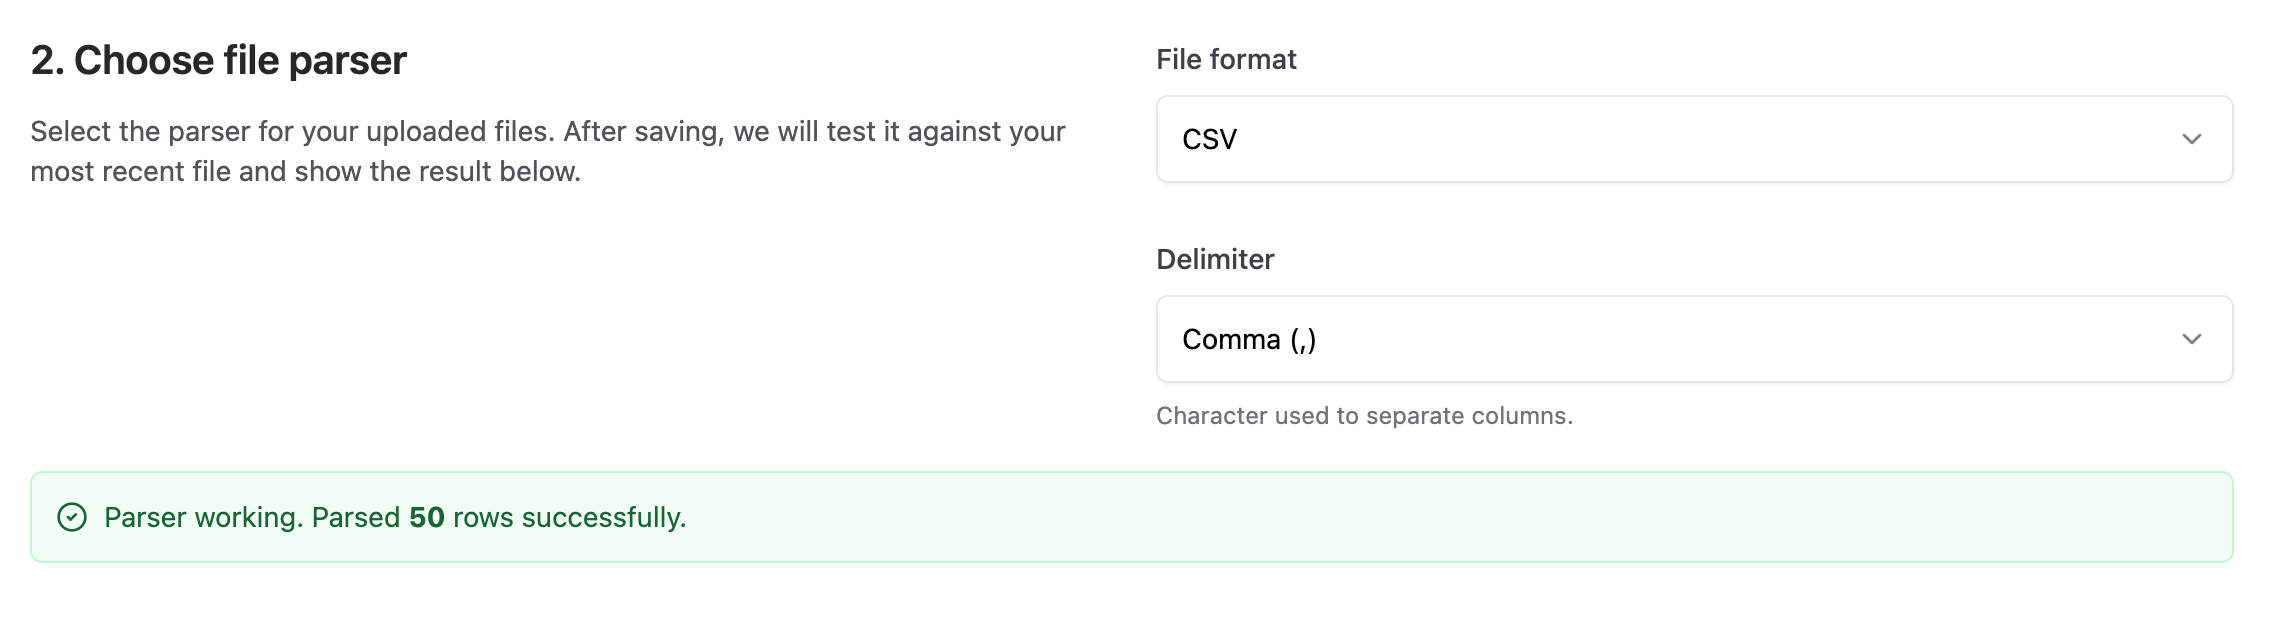
Kombo will automatically try to detect the file format. Supported formats are JSON, Excel (XLSX), and CSV. Verify the detected parser or manually select the correct one. Validate that the parsing works correctly by checking the number of rows parsed.For CSV files, you can also skip lines at the top of the file that aren’t part of the table, such as an export banner. If the file has no header row, turn off First row contains column names: columns are then named by position (column_1, column_2, and so on), and you pick and map them by those names in the next steps.
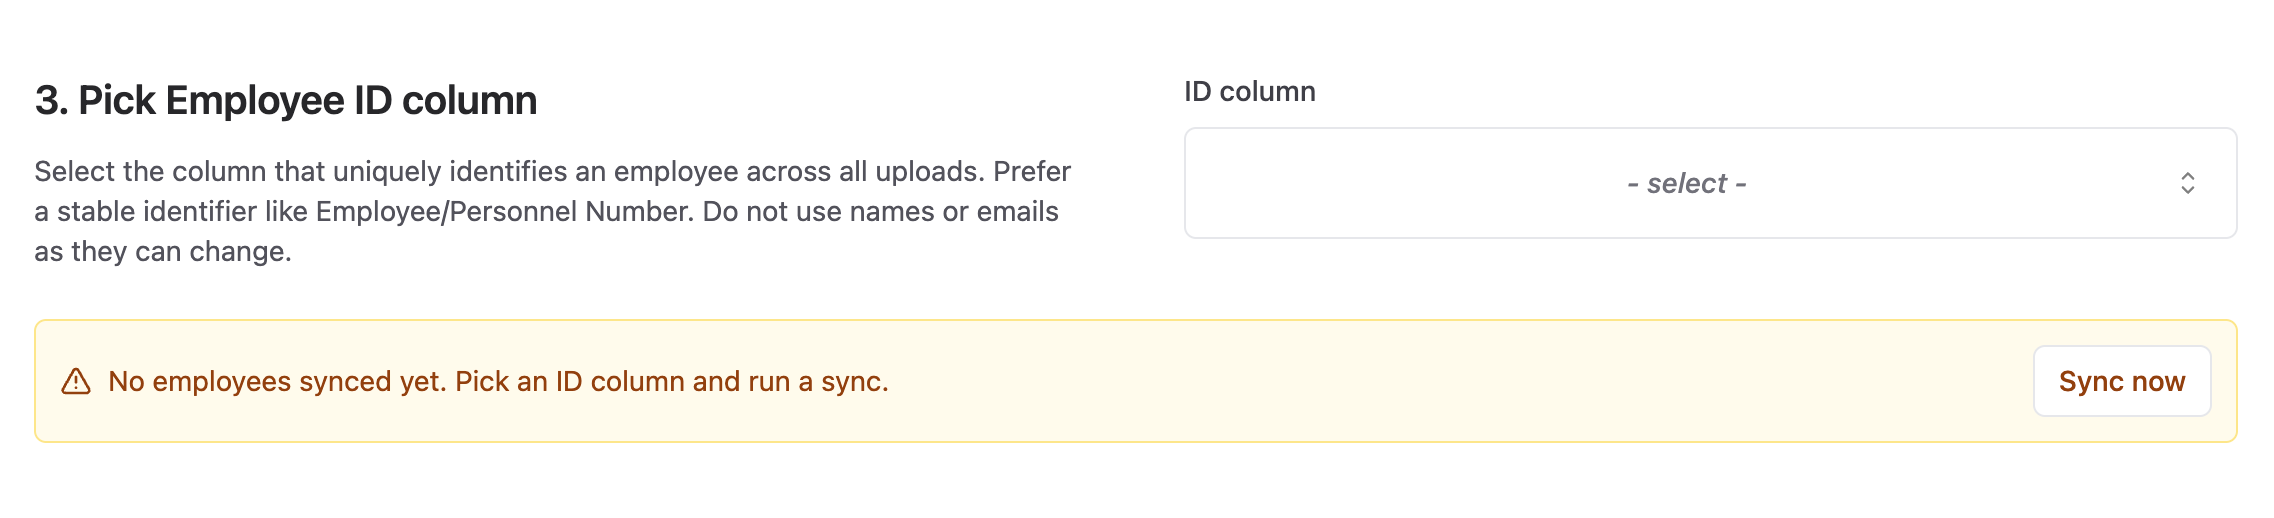
Select the column containing a unique and stable identifier for each employee. This identifier must remain consistent across all future uploads to reliably sync and deduplicate employee records.
The field mappings aren’t part of the steps above: scroll down the same page, past this SFTP section, to the per-model cards of our remapping feature and map all required fields there. A model only offers mappings when custom_fields or integration_fields are enabled for it in the integration’s scope config. The file’s columns become selectable after a sync that runs once the ID above is picked. Once you have mapped the fields, trigger another sync and check that the data is what you expect in the data explorer.
Sync attempts will intentionally fail until the mappings are fully configured to prevent incomplete or incorrect data from syncing into your system. Once you’re satisfied with the configuration and have verified the data in the Data Explorer, approve the connection. This approval allows successful syncs to proceed.
If your customer’s export format changes later, you can easily update and adjust the mappings directly within the dashboard at any time.
Was this page helpful?
{"docsConfig":{"theme":"mint","$schema":"https://mintlify.com/docs.json","name":"Kombo","colors":{"primary":"#14b8a6","light":"#5eead4","dark":"#15B8A6"},"logo":{"light":"https://mintcdn.com/kombo/5G-BTSylUTnMNzUN/logo/light.svg?fit=max\u0026auto=format\u0026n=5G-BTSylUTnMNzUN\u0026q=85\u0026s=e63a5882dfad565ffad086e946e31625","dark":"https://mintcdn.com/kombo/BvlFKneaD6eycZI3/logo/dark.svg?fit=max\u0026auto=format\u0026n=BvlFKneaD6eycZI3\u0026q=85\u0026s=c326174907f14ee7bef0e17d62708eba"},"favicon":"https://mintcdn.com/kombo/2lUmYlLqJZfpPMTz/favicon.svg?fit=max\u0026auto=format\u0026n=2lUmYlLqJZfpPMTz\u0026q=85\u0026s=06bfda04e248fb862b34c4e972d4b1a8","api":{"mdx":{"auth":{"method":"bearer"},"server":"https://api.kombo.dev/v1"}},"navbar":{"links":[{"href":"https://app.kombo.dev","label":"Dashboard"}],"primary":{"type":"button","label":"Get a demo","href":"https://www.kombo.dev/demo"}},"footer":{"socials":{"website":"https://www.kombo.dev/","linkedin":"https://www.linkedin.com/company/kombo-api/about"}},"seo":{"indexing":"all"},"contextual":{"options":["copy","view","chatgpt","claude","perplexity","mcp","cursor","vscode"],"display":"header"},"styling":{"latex":false},"navigation":{"pages":[]}},"deployment":{"deploymentMetadataValue":{"subdomain":"kombo","hasAudioNarration":false,"actualSubdomain":"kombo","customDomains":["docs.kombo.dev"],"gitSource":{"type":"github","owner":"kombohq","repo":"docs-prod","deployBranch":"main","contentDirectory":"","isPrivate":false,"mountPath":"","label":""},"chroma":{"liveDeploymentHistoryId":"6ae4580381cc57ac631e6deb","collectionId":"15994046-81b6-46a4-be30-58dd50f8f9e3","schemaVersion":"v3","latestBuiltDeploymentHistoryId":"6ae4580381cc57ac631e6deb"},"feedback":{"thumbs":true},"entitlements":{"AI_CHAT":{"status":"ENABLED"},"WEB_MCP":{"status":"ENABLED"},"NARRATION":{"status":"ENABLED"}},"buildId":"6ae7331ca3bb2421cadf36fd","clientVersion":"0.0.4044","searchFilterCounts":[{"language":"default","tag":"Developer documentation","count":696},{"language":"default","tag":"General","count":336},{"language":"default","tag":"Available Connectors","count":259},{"language":"default","tag":"HRIS","count":240},{"language":"default","tag":"ATS","count":238},{"language":"default","tag":"Features","count":114},{"language":"default","tag":"ATS Assessment \u0026 Background Check","count":90},{"language":"default","tag":"LMS","count":88},{"language":"default","tag":"Guides","count":75},{"language":"default","tag":"General API Reference","count":56}]},"assistantConfig":{},"basePath":"","hasChatPermissions":true,"hasWebMcpPermissions":true,"toggles":[{"name":"kill-isr","enabled":true,"variant":{"name":"disabled","enabled":false,"feature_enabled":true},"impressionData":false},{"name":"agent-mintlify-slack","enabled":true,"variant":{"name":"disabled","enabled":false,"feature_enabled":true},"impressionData":false},{"name":"agent-integrations-settings","enabled":true,"variant":{"name":"disabled","enabled":false,"feature_enabled":true},"impressionData":false},{"name":"automations-pr-grouping","enabled":true,"variant":{"name":"disabled","enabled":false,"feature_enabled":true},"impressionData":false},{"name":"custom-prefix","enabled":true,"variant":{"name":"disabled","enabled":false,"feature_enabled":true},"impressionData":false},{"name":"analytics-v7","enabled":true,"variant":{"name":"disabled","enabled":false,"feature_enabled":true},"impressionData":false},{"name":"user-flows-analytics","enabled":true,"variant":{"name":"disabled","enabled":false,"feature_enabled":true},"impressionData":false},{"name":"no-publish-flow","enabled":true,"variant":{"name":"disabled","enabled":false,"feature_enabled":true},"impressionData":false},{"name":"workos-onboarding","enabled":true,"variant":{"name":"disabled","enabled":false,"feature_enabled":true},"impressionData":false},{"name":"llms-txt-v2","enabled":true,"variant":{"name":"disabled","enabled":false,"feature_enabled":true},"impressionData":false},{"name":"snapshot-serving-live","enabled":true,"variant":{"name":"disabled","enabled":false,"feature_enabled":true},"impressionData":false},{"name":"stripTemperatureMiddleware","enabled":true,"variant":{"name":"disabled","enabled":false,"feature_enabled":true},"impressionData":false},{"name":"support-platform-pylon-zendesk","enabled":true,"variant":{"name":"disabled","enabled":false,"feature_enabled":true},"impressionData":false},{"name":"snapshot-serving","enabled":true,"variant":{"name":"disabled","enabled":false,"feature_enabled":true},"impressionData":false},{"name":"instant-rollback","enabled":true,"variant":{"name":"disabled","enabled":false,"feature_enabled":true},"impressionData":false},{"name":"granular-notifications-server","enabled":true,"variant":{"name":"disabled","enabled":false,"feature_enabled":true},"impressionData":false},{"name":"granular-notifications","enabled":true,"variant":{"name":"disabled","enabled":false,"feature_enabled":true},"impressionData":false},{"name":"automations-fable","enabled":true,"variant":{"name":"disabled","enabled":false,"feature_enabled":true},"impressionData":false},{"name":"fixed-ai-action-pricing","enabled":true,"variant":{"name":"disabled","enabled":false,"feature_enabled":true},"impressionData":false},{"name":"automation-resolve-merge-conflict","enabled":true,"variant":{"name":"disabled","enabled":false,"feature_enabled":true},"impressionData":false},{"name":"scoped-publishing","enabled":true,"variant":{"name":"disabled","enabled":false,"feature_enabled":true},"impressionData":false},{"name":"mintql","enabled":true,"variant":{"name":"disabled","enabled":false,"feature_enabled":true},"impressionData":false},{"name":"page-level-analytics","enabled":true,"variant":{"name":"disabled","enabled":false,"feature_enabled":true},"impressionData":false},{"name":"editor-version-history-v2","enabled":true,"variant":{"name":"disabled","enabled":false,"feature_enabled":true},"impressionData":false},{"name":"billing-page-v2","enabled":true,"variant":{"name":"disabled","enabled":false,"feature_enabled":true},"impressionData":false},{"name":"full-page-search","enabled":true,"variant":{"name":"disabled","enabled":false,"feature_enabled":true},"impressionData":false},{"name":"workspace-projects","enabled":true,"variant":{"name":"disabled","enabled":false,"feature_enabled":true},"impressionData":false},{"name":"assistant-v5","enabled":true,"variant":{"name":"disabled","enabled":false,"feature_enabled":true},"impressionData":false},{"name":"byok-sep-25","enabled":true,"variant":{"name":"disabled","enabled":false,"feature_enabled":true},"impressionData":false},{"name":"fork-pr-previews","enabled":true,"variant":{"name":"disabled","enabled":false,"feature_enabled":true},"impressionData":false},{"name":"revalidation-jwt","enabled":true,"variant":{"name":"disabled","enabled":false,"feature_enabled":true},"impressionData":false},{"name":"vite-origin","enabled":true,"variant":{"name":"disabled","enabled":false,"feature_enabled":true},"impressionData":false},{"name":"billing-updated-9-15","enabled":true,"variant":{"name":"disabled","enabled":false,"feature_enabled":true},"impressionData":false},{"name":"workos-sso-scim","enabled":true,"variant":{"name":"disabled","enabled":false,"feature_enabled":true},"impressionData":false},{"name":"hobby-abuse-scan","enabled":true,"variant":{"name":"disabled","enabled":false,"feature_enabled":true},"impressionData":false},{"name":"dashboard-inbox","enabled":true,"variant":{"name":"disabled","enabled":false,"feature_enabled":true},"impressionData":false},{"name":"workos-signup","enabled":true,"variant":{"name":"disabled","enabled":false,"feature_enabled":true},"impressionData":false},{"name":"turbopuffer-dual-write","enabled":true,"variant":{"name":"disabled","enabled":false,"feature_enabled":true},"impressionData":false},{"name":"workos-enabled","enabled":true,"variant":{"name":"disabled","enabled":false,"feature_enabled":true},"impressionData":false},{"name":"approve-review-flow","enabled":true,"variant":{"name":"disabled","enabled":false,"feature_enabled":true},"impressionData":false},{"name":"sso-setup-deadline-banner","enabled":true,"variant":{"name":"disabled","enabled":false,"feature_enabled":true},"impressionData":false}],"googleFontsInlined":false},"customCss":[{"filePath":"styles.css","content":"img[src^='https://storage.googleapis.com/kombo-assets/integrations/']{background-color:transparent!important}[data-name=frame] img{max-height:40vh}a[id]{scroll-margin-top:var(--scroll-mt)}"}],"page":{"pagePath":"hris/guides/sftp-self-serve","slug":"/hris/guides/sftp-self-serve","pageMetadata":{"title":"SFTP self-serve setup","description":"Configure SFTP integrations using Kombo's self-serve mapping tools.","icon":"sliders","href":"/hris/guides/sftp-self-serve"},"description":{"compiledSource":"\"use strict\";\nconst {jsx: _jsx} = arguments[0];\nconst {useMDXComponents: _provideComponents} = arguments[0];\nfunction _createMdxContent(props) {\n const _components = {\n p: \"p\",\n ..._provideComponents(),\n ...props.components\n };\n return _jsx(_components.p, {\n children: \"Configure SFTP integrations using Kombo’s self-serve mapping tools.\"\n });\n}\nfunction MDXContent(props = {}) {\n const {wrapper: MDXLayout} = {\n ..._provideComponents(),\n ...props.components\n };\n return MDXLayout ? _jsx(MDXLayout, {\n ...props,\n children: _jsx(_createMdxContent, {\n ...props\n })\n }) : _createMdxContent(props);\n}\nreturn {\n default: MDXContent\n};\n","frontmatter":{},"scope":{}},"pageType":"default","mdx":{"mdxSource":{"compiledSource":"\"use strict\";const{Fragment:_Fragment,jsx:_jsx,jsxs:_jsxs}=arguments[0];const{useMDXComponents:_provideComponents}=arguments[0];function _createMdxContent(props){const _components={a:`a`,code:`code`,p:`p`,strong:`strong`,..._provideComponents(),...props.components},{Heading,OptimizedImage,Warning}=_components;if(!Heading)_missingMdxReference(`Heading`,true);if(!OptimizedImage)_missingMdxReference(`OptimizedImage`,true);if(!Warning)_missingMdxReference(`Warning`,true);return _jsxs(_Fragment,{children:[_jsx(Heading,{level:`2`,id:`overview`,children:`Overview`}),`\n`,_jsx(_components.p,{children:`Kombo supports SFTP integrations where your customers can send data to our servers in any format, which we then normalize into our unified model.\nBecause we accept any file structure as provided by the customer’s system, each integration requires its own mapping configuration.`}),`\n`,_jsx(_components.p,{children:`When the first file for an SFTP integration is received, the initial sync will fail because no mappings are set up yet — this is expected.\nOur support team is automatically notified and will create the necessary mappings.\nAlternatively, you can configure or adjust the mappings yourself using self-serve mapping.`}),`\n`,_jsx(Warning,{children:_jsxs(_components.p,{children:[_jsx(_components.strong,{children:`Self-serve mapping is only available for SFTP connections that deliver a\nsingle export file per sync.`}),` If your customer’s system exports multiple\nfiles (e.g., separate files for employees, absences, and time off balances),\nyou will need to contact our support team to set up custom mappings.`]})}),`\n`,_jsx(Heading,{level:`2`,id:`self-serve-sftp-mappings`,children:`Self-serve SFTP mappings`}),`\n`,_jsx(Heading,{level:`3`,id:`1-inspect-the-uploaded-files`,children:`1. Inspect the uploaded files`}),`\n`,_jsx(_components.p,{children:`You can view the uploaded files in the Kombo dashboard to review their structure and verify data completeness. Confirm that the exported data meets your expectations before proceeding. This requires admin permissions.`}),`\n`,_jsx(OptimizedImage,{src:`https://mintcdn.com/kombo/YVVQf_YlJmXo0zcl/images/sftp/inspect-files.png?fit=max\u0026auto=format\u0026n=YVVQf_YlJmXo0zcl\u0026q=85\u0026s=06117bb9b215d52da6d0346bc8422f4c`,alt:`image`,\"data-og-width\":`2348`,width:`2348`,\"data-og-height\":`698`,height:`698`,\"data-path\":`images/sftp/inspect-files.png`,\"data-optimize\":`true`,\"data-opv\":`3`,srcset:`https://mintcdn.com/kombo/YVVQf_YlJmXo0zcl/images/sftp/inspect-files.png?w=280\u0026fit=max\u0026auto=format\u0026n=YVVQf_YlJmXo0zcl\u0026q=85\u0026s=9a65c25985a7dd7ba16fb69fde561275 280w, https://mintcdn.com/kombo/YVVQf_YlJmXo0zcl/images/sftp/inspect-files.png?w=560\u0026fit=max\u0026auto=format\u0026n=YVVQf_YlJmXo0zcl\u0026q=85\u0026s=04e928d29adee66b90e3b4bf567cc2f0 560w, https://mintcdn.com/kombo/YVVQf_YlJmXo0zcl/images/sftp/inspect-files.png?w=840\u0026fit=max\u0026auto=format\u0026n=YVVQf_YlJmXo0zcl\u0026q=85\u0026s=2e4b916c53c524e7d17e3d2756facb1e 840w, https://mintcdn.com/kombo/YVVQf_YlJmXo0zcl/images/sftp/inspect-files.png?w=1100\u0026fit=max\u0026auto=format\u0026n=YVVQf_YlJmXo0zcl\u0026q=85\u0026s=075db39c4d84be88ed013156d9754f45 1100w, https://mintcdn.com/kombo/YVVQf_YlJmXo0zcl/images/sftp/inspect-files.png?w=1650\u0026fit=max\u0026auto=format\u0026n=YVVQf_YlJmXo0zcl\u0026q=85\u0026s=21bd046e36cbee8460619f23cd62a612 1650w, https://mintcdn.com/kombo/YVVQf_YlJmXo0zcl/images/sftp/inspect-files.png?w=2500\u0026fit=max\u0026auto=format\u0026n=YVVQf_YlJmXo0zcl\u0026q=85\u0026s=2116978ded01a5c54f006aa1c13c45c5 2500w`}),`\n`,_jsx(Heading,{level:`3`,id:`2-select-a-file-parser`,children:`2. Select a file parser`}),`\n`,_jsx(_components.p,{children:`Kombo will automatically try to detect the file format. Supported formats are JSON, Excel (XLSX), and CSV. Verify the detected parser or manually select the correct one. Validate that the parsing works correctly by checking the number of rows parsed.`}),`\n`,_jsxs(_components.p,{children:[`For CSV files, you can also skip lines at the top of the file that aren’t part of the table, such as an export banner. If the file has no header row, turn off `,_jsx(_components.strong,{children:`First row contains column names`}),`: columns are then named by position (`,_jsx(_components.code,{children:`column_1`}),`, `,_jsx(_components.code,{children:`column_2`}),`, and so on), and you pick and map them by those names in the next steps.`]}),`\n`,_jsx(OptimizedImage,{src:`https://mintcdn.com/kombo/YVVQf_YlJmXo0zcl/images/sftp/file-parser.png?fit=max\u0026auto=format\u0026n=YVVQf_YlJmXo0zcl\u0026q=85\u0026s=ef3fbb4b8124178fc4c40eca81811edf`,alt:`image`,\"data-og-width\":`2274`,width:`2274`,\"data-og-height\":`618`,height:`618`,\"data-path\":`images/sftp/file-parser.png`,\"data-optimize\":`true`,\"data-opv\":`3`,srcset:`https://mintcdn.com/kombo/YVVQf_YlJmXo0zcl/images/sftp/file-parser.png?w=280\u0026fit=max\u0026auto=format\u0026n=YVVQf_YlJmXo0zcl\u0026q=85\u0026s=62e9b62efbaf3d8dd8c5c90c5d4c5f9d 280w, https://mintcdn.com/kombo/YVVQf_YlJmXo0zcl/images/sftp/file-parser.png?w=560\u0026fit=max\u0026auto=format\u0026n=YVVQf_YlJmXo0zcl\u0026q=85\u0026s=0dcc304cffad0d221cc8003b7096f1ab 560w, https://mintcdn.com/kombo/YVVQf_YlJmXo0zcl/images/sftp/file-parser.png?w=840\u0026fit=max\u0026auto=format\u0026n=YVVQf_YlJmXo0zcl\u0026q=85\u0026s=cf939eafea90124948609e2567565491 840w, https://mintcdn.com/kombo/YVVQf_YlJmXo0zcl/images/sftp/file-parser.png?w=1100\u0026fit=max\u0026auto=format\u0026n=YVVQf_YlJmXo0zcl\u0026q=85\u0026s=d9ad98eab1620e660655517834d4e366 1100w, https://mintcdn.com/kombo/YVVQf_YlJmXo0zcl/images/sftp/file-parser.png?w=1650\u0026fit=max\u0026auto=format\u0026n=YVVQf_YlJmXo0zcl\u0026q=85\u0026s=d1e5289716252e96153384350db2c241 1650w, https://mintcdn.com/kombo/YVVQf_YlJmXo0zcl/images/sftp/file-parser.png?w=2500\u0026fit=max\u0026auto=format\u0026n=YVVQf_YlJmXo0zcl\u0026q=85\u0026s=ab22faa8d757c45e1a58c89266b1f947 2500w`}),`\n`,_jsx(Heading,{level:`3`,id:`3-choose-the-employee-id-column`,children:`3. Choose the employee ID column`}),`\n`,_jsx(_components.p,{children:`Select the column containing a unique and stable identifier for each employee. This identifier must remain consistent across all future uploads to reliably sync and deduplicate employee records.`}),`\n`,_jsx(OptimizedImage,{src:`https://mintcdn.com/kombo/YVVQf_YlJmXo0zcl/images/sftp/id-column.png?fit=max\u0026auto=format\u0026n=YVVQf_YlJmXo0zcl\u0026q=85\u0026s=53216963b9b6ec6ec5de683db1f74460`,alt:`image`,\"data-og-width\":`2274`,width:`2274`,\"data-og-height\":`518`,height:`518`,\"data-path\":`images/sftp/id-column.png`,\"data-optimize\":`true`,\"data-opv\":`3`,srcset:`https://mintcdn.com/kombo/YVVQf_YlJmXo0zcl/images/sftp/id-column.png?w=280\u0026fit=max\u0026auto=format\u0026n=YVVQf_YlJmXo0zcl\u0026q=85\u0026s=2f41925fa9477d947d34d67709e51293 280w, https://mintcdn.com/kombo/YVVQf_YlJmXo0zcl/images/sftp/id-column.png?w=560\u0026fit=max\u0026auto=format\u0026n=YVVQf_YlJmXo0zcl\u0026q=85\u0026s=bd66f30f4eaf764e098b5eab4242ead8 560w, https://mintcdn.com/kombo/YVVQf_YlJmXo0zcl/images/sftp/id-column.png?w=840\u0026fit=max\u0026auto=format\u0026n=YVVQf_YlJmXo0zcl\u0026q=85\u0026s=5fb901d65017e36b9d80c98190eb392d 840w, https://mintcdn.com/kombo/YVVQf_YlJmXo0zcl/images/sftp/id-column.png?w=1100\u0026fit=max\u0026auto=format\u0026n=YVVQf_YlJmXo0zcl\u0026q=85\u0026s=ee5e056b6ebfcc93b475764d4c9c1744 1100w, https://mintcdn.com/kombo/YVVQf_YlJmXo0zcl/images/sftp/id-column.png?w=1650\u0026fit=max\u0026auto=format\u0026n=YVVQf_YlJmXo0zcl\u0026q=85\u0026s=ead0e863ed7c0986215821a5661ee40f 1650w, https://mintcdn.com/kombo/YVVQf_YlJmXo0zcl/images/sftp/id-column.png?w=2500\u0026fit=max\u0026auto=format\u0026n=YVVQf_YlJmXo0zcl\u0026q=85\u0026s=86210a284bddeb3a91f26fe6bc66410b 2500w`}),`\n`,_jsx(Heading,{level:`3`,id:`4-map-fields-with-remapping`,children:`4. Map fields with remapping`}),`\n`,_jsxs(_components.p,{children:[`The field mappings aren’t part of the steps above: scroll down the same page, past this SFTP section, to the per-model cards of our `,_jsx(_components.a,{href:`/hris/features/remapping/introduction`,children:`remapping feature`}),` and map all required fields there. A model only offers mappings when `,_jsx(_components.code,{children:`custom_fields`}),` or `,_jsx(_components.code,{children:`integration_fields`}),` are enabled for it in the integration’s scope config. The file’s columns become selectable after a sync that runs once the ID above is picked. Once you have mapped the fields, trigger another sync and check that the data is what you expect in the `,_jsx(_components.a,{href:`/hris/features/data-explorer`,children:`data explorer`}),`.`]}),`\n`,_jsx(Heading,{level:`3`,id:`5-approve-the-connection`,children:`5. Approve the connection`}),`\n`,_jsx(_components.p,{children:`Sync attempts will intentionally fail until the mappings are fully configured to prevent incomplete or incorrect data from syncing into your system. Once you’re satisfied with the configuration and have verified the data in the Data Explorer, approve the connection. This approval allows successful syncs to proceed.`}),`\n`,_jsx(Heading,{level:`2`,id:`adjusting-mappings`,children:`Adjusting mappings`}),`\n`,_jsx(_components.p,{children:`If your customer’s export format changes later, you can easily update and adjust the mappings directly within the dashboard at any time.`})]})}function MDXContent(props={}){const{wrapper:MDXLayout}={..._provideComponents(),...props.components};return MDXLayout?_jsx(MDXLayout,{...props,children:_jsx(_createMdxContent,{...props})}):_createMdxContent(props)}return{default:MDXContent};function _missingMdxReference(id,component){throw new Error(`Expected `+(component?`component`:`object`)+\" `\"+id+\"` to be defined: you likely forgot to import, pass, or provide it.\")}","frontmatter":{},"scope":{"config":{},"pageMetadata":{"title":"SFTP self-serve setup","description":"Configure SFTP integrations using Kombo's self-serve mapping tools.","icon":"sliders","href":"/hris/guides/sftp-self-serve"}}},"mdxSourceWithNoJs":null},"mdxExtracts":{"tableOfContents":[{"title":"Overview","slug":"overview","depth":2,"children":[]},{"title":"Self-serve SFTP mappings","slug":"self-serve-sftp-mappings","depth":2,"children":[{"title":"1. Inspect the uploaded files","slug":"1-inspect-the-uploaded-files","depth":3,"children":[]},{"title":"2. Select a file parser","slug":"2-select-a-file-parser","depth":3,"children":[]},{"title":"3. Choose the employee ID column","slug":"3-choose-the-employee-id-column","depth":3,"children":[]},{"title":"4. Map fields with remapping","slug":"4-map-fields-with-remapping","depth":3,"children":[]},{"title":"5. Approve the connection","slug":"5-approve-the-connection","depth":3,"children":[]}]},{"title":"Adjusting mappings","slug":"adjusting-mappings","depth":2,"children":[]}],"codeExamples":{}},"jsLinks":["/_mintlify/custom/kombo/807f792f5d0ef37a/rb2b.js","/_mintlify/custom/kombo/6fdcec7d895f83f2/auto-expand-response-fields.js"],"subdomain":"kombo","siteName":"Kombo","title":"SFTP self-serve setup - Kombo","navMaps":{"firstHrefInVersion":{},"firstHrefInLanguage":{}},"lastModified":"2026-10-28T18:00:37.830Z","originalFileLocation":"hris/guides/sftp-self-serve.mdx"},"headHtml":"\u003cscript data-mint-head>(function(){var d=document.documentElement,p=null;if(!p){try{p=localStorage.getItem(\"isDarkMode\")}catch(e){}if(p==='true')p='dark';else if(p==='false')p='light';if(p!=='light'\u0026\u0026p!=='dark'\u0026\u0026p!=='system')p=\"system\"}var r=p==='system'?(matchMedia(\"(prefers-color-scheme: dark)\").matches?'dark':'light'):p;d.classList.remove(r==='dark'?'light':'dark');d.classList.add(r);d.setAttribute(\"data-theme-preference\",p)})();\u003c/script>\u003cmeta data-mint-head name=\"description\" content=\"Configure SFTP integrations using Kombo\u0026#x27;s self-serve mapping tools.\">\u003cmeta data-mint-head name=\"application-name\" content=\"Kombo\">\u003cmeta data-mint-head name=\"generator\" content=\"Mintlify\">\u003clink data-mint-head rel=\"icon\" type=\"image/png\" sizes=\"192x192\" href=\"/mintlify-assets/_mintlify/favicons/kombo/wSCKBGtwRd2fRaqL/_generated/favicon/android-chrome-192x192.png\" media=\"(prefers-color-scheme: light)\">\u003clink data-mint-head rel=\"apple-touch-icon\" type=\"image/png\" sizes=\"180x180\" href=\"/mintlify-assets/_mintlify/favicons/kombo/wSCKBGtwRd2fRaqL/_generated/favicon/apple-touch-icon.png\">\u003clink data-mint-head rel=\"icon\" type=\"image/png\" sizes=\"16x16\" href=\"/mintlify-assets/_mintlify/favicons/kombo/wSCKBGtwRd2fRaqL/_generated/favicon/favicon-16x16.png\" media=\"(prefers-color-scheme: light)\">\u003clink data-mint-head rel=\"icon\" type=\"image/png\" sizes=\"32x32\" href=\"/mintlify-assets/_mintlify/favicons/kombo/wSCKBGtwRd2fRaqL/_generated/favicon/favicon-32x32.png\" media=\"(prefers-color-scheme: light)\">\u003clink data-mint-head rel=\"shortcut icon\" type=\"image/x-icon\" href=\"/mintlify-assets/_mintlify/favicons/kombo/wSCKBGtwRd2fRaqL/_generated/favicon/favicon.ico\" media=\"(prefers-color-scheme: light)\">\u003clink data-mint-head rel=\"icon\" type=\"image/png\" sizes=\"192x192\" href=\"/mintlify-assets/_mintlify/favicons/kombo/wSCKBGtwRd2fRaqL/_generated/favicon-dark/android-chrome-192x192.png\" media=\"(prefers-color-scheme: dark)\">\u003clink data-mint-head rel=\"icon\" type=\"image/png\" sizes=\"16x16\" href=\"/mintlify-assets/_mintlify/favicons/kombo/wSCKBGtwRd2fRaqL/_generated/favicon-dark/favicon-16x16.png\" media=\"(prefers-color-scheme: dark)\">\u003clink data-mint-head rel=\"icon\" type=\"image/png\" sizes=\"32x32\" href=\"/mintlify-assets/_mintlify/favicons/kombo/wSCKBGtwRd2fRaqL/_generated/favicon-dark/favicon-32x32.png\" media=\"(prefers-color-scheme: dark)\">\u003clink data-mint-head rel=\"shortcut icon\" type=\"image/x-icon\" href=\"/mintlify-assets/_mintlify/favicons/kombo/wSCKBGtwRd2fRaqL/_generated/favicon-dark/favicon.ico\" media=\"(prefers-color-scheme: dark)\">\u003cmeta data-mint-head property=\"og:title\" content=\"SFTP self-serve setup - Kombo\">\u003cmeta data-mint-head property=\"og:description\" content=\"Configure SFTP integrations using Kombo\u0026#x27;s self-serve mapping tools.\">\u003cmeta data-mint-head property=\"og:site_name\" content=\"Kombo\">\u003cmeta data-mint-head property=\"og:url\" content=\"https://docs.kombo.dev/hris/guides/sftp-self-serve\">\u003cmeta data-mint-head property=\"og:type\" content=\"website\">\u003cmeta data-mint-head property=\"og:image\" content=\"https://kombo.mintlify.app/_mintlify/api/og/v2?division=Guides\u0026amp;title=SFTP+self-serve+setup\u0026amp;description=Configure+SFTP+integrations+using+Kombo%27s+self-serve+mapping+tools.\u0026amp;theme=6aaa982de16023004d39177d\u0026amp;signature=cdbee5507766822b3500b8572d4ae7f350b6452913438d4d39f223fcff8fe397\">\u003cmeta data-mint-head property=\"og:image:width\" content=\"1200\">\u003cmeta data-mint-head property=\"og:image:height\" content=\"630\">\u003cmeta data-mint-head name=\"twitter:card\" content=\"summary_large_image\">\u003cmeta data-mint-head name=\"twitter:title\" content=\"SFTP self-serve setup - Kombo\">\u003cmeta data-mint-head name=\"twitter:description\" content=\"Configure SFTP integrations using Kombo\u0026#x27;s self-serve mapping tools.\">\u003cmeta data-mint-head name=\"twitter:image\" content=\"https://kombo.mintlify.app/_mintlify/api/og/v2?division=Guides\u0026amp;title=SFTP+self-serve+setup\u0026amp;description=Configure+SFTP+integrations+using+Kombo%27s+self-serve+mapping+tools.\u0026amp;theme=6aaa982de16023004d39177d\u0026amp;signature=cdbee5507766822b3500b8572d4ae7f350b6452913438d4d39f223fcff8fe397\">\u003cmeta data-mint-head name=\"twitter:image:width\" content=\"1200\">\u003cmeta data-mint-head name=\"twitter:image:height\" content=\"630\">\u003cmeta data-mint-head name=\"msapplication-config\" content=\"/mintlify-assets/_mintlify/favicons/kombo/wSCKBGtwRd2fRaqL/_generated/favicon/browserconfig.xml\">\u003cmeta data-mint-head name=\"apple-mobile-web-app-title\" content=\"Kombo\">\u003cmeta data-mint-head name=\"msapplication-TileColor\" content=\"#14b8a6\">\u003clink data-mint-head rel=\"canonical\" href=\"https://docs.kombo.dev/hris/guides/sftp-self-serve\">\u003clink data-mint-head rel=\"alternate\" type=\"application/xml\" href=\"/sitemap.xml\">\u003clink data-mint-head rel=\"alternate\" type=\"text/markdown\" href=\"/hris/guides/sftp-self-serve.md\">\u003cscript data-mint-head type=\"application/ld+json\">{\"@context\":\"https://schema.org\",\"@graph\":[{\"@type\":\"Organization\",\"@id\":\"https://docs.kombo.dev/#organization\",\"name\":\"Kombo\",\"url\":\"https://docs.kombo.dev\",\"logo\":{\"@type\":\"ImageObject\",\"url\":\"https://mintcdn.com/kombo/5G-BTSylUTnMNzUN/logo/light.svg?fit=max\u0026auto=format\u0026n=5G-BTSylUTnMNzUN\u0026q=85\u0026s=e63a5882dfad565ffad086e946e31625\"}},{\"@type\":\"WebSite\",\"@id\":\"https://docs.kombo.dev#website\",\"name\":\"Kombo\",\"url\":\"https://docs.kombo.dev\",\"publisher\":{\"@id\":\"https://docs.kombo.dev/#organization\"}},{\"@type\":\"WebPage\",\"@id\":\"https://docs.kombo.dev/hris/guides/sftp-self-serve#webpage\",\"url\":\"https://docs.kombo.dev/hris/guides/sftp-self-serve\",\"name\":\"SFTP self-serve setup\",\"description\":\"Configure SFTP integrations using Kombo's self-serve mapping tools.\",\"dateModified\":\"2026-10-28T18:00:37.830Z\",\"isPartOf\":{\"@id\":\"https://docs.kombo.dev#website\"},\"breadcrumb\":{\"@id\":\"https://docs.kombo.dev/hris/guides/sftp-self-serve#breadcrumb\"}},{\"@type\":\"BreadcrumbList\",\"@id\":\"https://docs.kombo.dev/hris/guides/sftp-self-serve#breadcrumb\",\"itemListElement\":[{\"@type\":\"ListItem\",\"position\":1,\"name\":\"Guides\",\"item\":\"https://docs.kombo.dev/hris/guides/connect/introduction\"},{\"@type\":\"ListItem\",\"position\":2,\"name\":\"SFTP self-serve setup\",\"item\":\"https://docs.kombo.dev/hris/guides/sftp-self-serve\"}]},{\"@type\":[\"Article\",\"TechArticle\"],\"@id\":\"https://docs.kombo.dev/hris/guides/sftp-self-serve#article\",\"headline\":\"SFTP self-serve setup\",\"name\":\"SFTP self-serve setup\",\"description\":\"Configure SFTP integrations using Kombo's self-serve mapping tools.\",\"url\":\"https://docs.kombo.dev/hris/guides/sftp-self-serve\",\"mainEntityOfPage\":{\"@id\":\"https://docs.kombo.dev/hris/guides/sftp-self-serve#webpage\"},\"dateModified\":\"2026-10-28T18:00:37.830Z\",\"publisher\":{\"@id\":\"https://docs.kombo.dev/#organization\"},\"isPartOf\":{\"@id\":\"https://docs.kombo.dev#website\"}}]}\u003c/script>\u003cscript data-mint-head type=\"application/ld+json\">{\"@context\":\"https://schema.org\",\"@type\":\"WebSite\",\"name\":\"Kombo\",\"creator\":{\"@type\":\"Organization\",\"name\":\"Mintlify\",\"url\":\"https://mintlify.com\"}}\u003c/script>","siteName":"Kombo","nav":{"global":null,"tabs":[{"tab":"Developer documentation","icon":"code","anchors":[{"anchor":"Overview","pages":[{"title":"Overview","href":"/introduction"}]},{"anchor":"HRIS","icon":"users","groups":[{"group":"General","icon":"circle-info","pages":[{"title":"Introduction","icon":"book-open","href":"/hris/introduction"},{"group":"Getting started","icon":"signs-post","pages":[{"title":"Overview","icon":"rocket","href":"/hris/getting-started"},{"title":"Sandbox Integrations","icon":"flask","href":"/hris/getting-started/sandbox-integrations"},{"title":"Creating Integrations","icon":"link","href":"/hris/getting-started/create-integrations"},{"title":"Authentication","icon":"key","href":"/hris/getting-started/authentication"},{"title":"Querying the API","icon":"magnifying-glass","href":"/hris/getting-started/querying-api"},{"title":"Fetching Data","icon":"download","href":"/hris/getting-started/fetching-data"}]},{"group":"Implementation guide","icon":"user-magnifying-glass","pages":[{"title":"Context","icon":"circle-info","href":"/hris/implementation-guide/context"},{"title":"Setup","icon":"wrench","href":"/hris/implementation-guide/setup"},{"title":"Connection setup","icon":"link","href":"/hris/implementation-guide/connection-setup"},{"group":"Filtering employees","icon":"filter","pages":[{"title":"Context","icon":"filter","href":"/hris/implementation-guide/filtering-employees/context"},{"title":"Using the filtering UI","icon":"sliders","href":"/hris/implementation-guide/filtering-employees/using-the-filtering-ui"},{"title":"Building filtering in-house","icon":"wrench","href":"/hris/implementation-guide/filtering-employees/building-filtering-in-house"}]},{"title":"Reading employees","icon":"users","href":"/hris/implementation-guide/reading-employees"},{"title":"Creating Employees (v2)","icon":"user-plus","href":"/hris/implementation-guide/create-employee"},{"title":"Create Employee Form with Staffing Entities","icon":"briefcase","href":"/hris/implementation-guide/staffing-entities-in-create-employee"}]},{"group":"Available Connectors","icon":"plug","pages":[{"title":"Available HRIS Connectors","sidebarTitle":"Overview","icon":"grid-2","href":"/hris/connectors"},{"title":"a3innuva Nómina HRIS Integration","sidebarTitle":"a3innuva Nómina","icon":"https://storage.googleapis.com/kombo-assets/integrations/a3innuvanomina/icon.svg","href":"/hris/connectors/a3innuvanomina"},{"title":"Abacus HRIS Integration","sidebarTitle":"Abacus","icon":"https://storage.googleapis.com/kombo-assets/integrations/abacus/icon.svg","href":"/hris/connectors/abacus"},{"title":"Absence.io HRIS Integration","sidebarTitle":"Absence.io","icon":"https://storage.googleapis.com/kombo-assets/integrations/absenceio/icon.svg","href":"/hris/connectors/absenceio"},{"title":"ADP Decidium HRIS Integration","sidebarTitle":"ADP Decidium","icon":"https://storage.googleapis.com/kombo-assets/integrations/adpdecidium/icon.svg","href":"/hris/connectors/adpdecidium"},{"title":"ADP Link HRIS Integration","sidebarTitle":"ADP Link","icon":"https://storage.googleapis.com/kombo-assets/integrations/adplink/icon.svg","href":"/hris/connectors/adplink"},{"title":"ADP Workforce Now HRIS Integration","sidebarTitle":"ADP Workforce Now","icon":"https://storage.googleapis.com/kombo-assets/integrations/adpworkforcenow/icon.svg","href":"/hris/connectors/adpworkforcenow"},{"title":"AFAS Software HRIS Integration","sidebarTitle":"AFAS Software","icon":"https://storage.googleapis.com/kombo-assets/integrations/afas/icon.svg","href":"/hris/connectors/afas"},{"title":"AlexisHR HRIS Integration","sidebarTitle":"AlexisHR","icon":"https://storage.googleapis.com/kombo-assets/integrations/alexishr/icon.svg","href":"/hris/connectors/alexishr"},{"title":"BambooHR HRIS Integration","sidebarTitle":"BambooHR","icon":"https://storage.googleapis.com/kombo-assets/integrations/bamboohr/icon.svg","href":"/hris/connectors/bamboohr"},{"title":"BoondManager HRIS Integration","sidebarTitle":"BoondManager","icon":"https://storage.googleapis.com/kombo-assets/integrations/boondmanager/icon.svg","href":"/hris/connectors/boondmanager"},{"title":"Breathe HR HRIS Integration","sidebarTitle":"Breathe HR","icon":"https://storage.googleapis.com/kombo-assets/integrations/breathehr/icon.svg","href":"/hris/connectors/breathehr"},{"title":"CatalystOne HRIS Integration","sidebarTitle":"CatalystOne","icon":"https://storage.googleapis.com/kombo-assets/integrations/catalystone/icon.svg","href":"/hris/connectors/catalystone"},{"title":"Cezanne HR HRIS Integration","sidebarTitle":"Cezanne HR","icon":"https://storage.googleapis.com/kombo-assets/integrations/cezannehr/icon.svg","href":"/hris/connectors/cezannehr"},{"title":"Charlie HRIS Integration","sidebarTitle":"Charlie","icon":"https://storage.googleapis.com/kombo-assets/integrations/charliehr/icon.svg","href":"/hris/connectors/charliehr"},{"title":"Cornerstone OnDemand HRIS Integration","sidebarTitle":"Cornerstone OnDemand","icon":"https://storage.googleapis.com/kombo-assets/integrations/cornerstoneondemand/icon.svg","href":"/hris/connectors/cornerstoneondemand"},{"title":"DATEV HRIS Integration","sidebarTitle":"DATEV","icon":"https://storage.googleapis.com/kombo-assets/integrations/datevlauds/icon.svg","href":"/hris/connectors/datevlauds"},{"title":"DATEV HR HRIS Integration","sidebarTitle":"DATEV HR","icon":"https://storage.googleapis.com/kombo-assets/integrations/datevhr/icon.svg","href":"/hris/connectors/datevhr"},{"title":"DATEV LODAS HRIS Integration","sidebarTitle":"DATEV LODAS","icon":"https://storage.googleapis.com/kombo-assets/integrations/datev/icon.svg","href":"/hris/connectors/datev"},{"title":"DATEV Lohn \u0026 Gehalt HRIS Integration","sidebarTitle":"DATEV Lohn \u0026 Gehalt","icon":"https://storage.googleapis.com/kombo-assets/integrations/datevlug/icon.svg","href":"/hris/connectors/datevlug"},{"title":"Dayforce HRIS Integration","sidebarTitle":"Dayforce","icon":"https://storage.googleapis.com/kombo-assets/integrations/dayforce/icon.svg","href":"/hris/connectors/dayforce"},{"title":"Deel HRIS Integration","sidebarTitle":"Deel","icon":"https://storage.googleapis.com/kombo-assets/integrations/deel/icon.svg","href":"/hris/connectors/deel"},{"title":"Employment Hero HRIS Integration","sidebarTitle":"Employment Hero","icon":"https://storage.googleapis.com/kombo-assets/integrations/employmenthero/icon.svg","href":"/hris/connectors/employmenthero"},{"title":"Eurécia HRIS Integration","sidebarTitle":"Eurécia","icon":"https://storage.googleapis.com/kombo-assets/integrations/eurecia/icon.svg","href":"/hris/connectors/eurecia"},{"title":"Factorial HRIS Integration","sidebarTitle":"Factorial","icon":"https://storage.googleapis.com/kombo-assets/integrations/factorial/icon.svg","href":"/hris/connectors/factorial"},{"title":"Fourth HRIS Integration","sidebarTitle":"Fourth","icon":"https://storage.googleapis.com/kombo-assets/integrations/fourth/icon.svg","href":"/hris/connectors/fourth"},{"title":"Google Workspace HRIS Integration","sidebarTitle":"Google Workspace","icon":"https://storage.googleapis.com/kombo-assets/integrations/googleworkspace/icon.svg","href":"/hris/connectors/googleworkspace"},{"title":"Gusto HRIS Integration","sidebarTitle":"Gusto","icon":"https://storage.googleapis.com/kombo-assets/integrations/gusto/icon.svg","href":"/hris/connectors/gusto"},{"title":"Hailey HR HRIS Integration","sidebarTitle":"Hailey HR","icon":"https://storage.googleapis.com/kombo-assets/integrations/haileyhr/icon.svg","href":"/hris/connectors/haileyhr"},{"title":"Hansalog HRIS Integration","sidebarTitle":"Hansalog","icon":"https://storage.googleapis.com/kombo-assets/integrations/hansalog/icon.svg","href":"/hris/connectors/hansalog"},{"title":"HeavenHR HRIS Integration","sidebarTitle":"HeavenHR","icon":"https://storage.googleapis.com/kombo-assets/integrations/heavenhr/icon.svg","href":"/hris/connectors/heavenhr"},{"title":"HiBob HRIS Integration","sidebarTitle":"HiBob","icon":"https://storage.googleapis.com/kombo-assets/integrations/hibob/icon.svg","href":"/hris/connectors/hibob"},{"title":"HoorayHR HRIS Integration","sidebarTitle":"HoorayHR","icon":"https://storage.googleapis.com/kombo-assets/integrations/hoorayhr/icon.svg","href":"/hris/connectors/hoorayhr"},{"title":"HR WORKS HRIS Integration","sidebarTitle":"HR WORKS","icon":"https://storage.googleapis.com/kombo-assets/integrations/hrworks/icon.svg","href":"/hris/connectors/hrworks"},{"title":"HR4YOU HRIS Integration","sidebarTitle":"HR4YOU","icon":"https://storage.googleapis.com/kombo-assets/integrations/hr4you/icon.svg","href":"/hris/connectors/hr4you"},{"title":"Humaans HRIS Integration","sidebarTitle":"Humaans","icon":"https://storage.googleapis.com/kombo-assets/integrations/humaans/icon.svg","href":"/hris/connectors/humaans"},{"title":"Insperity HRIS Integration","sidebarTitle":"Insperity","icon":"https://storage.googleapis.com/kombo-assets/integrations/insperity/icon.svg","href":"/hris/connectors/insperity"},{"title":"IRIS Cascade HRIS Integration","sidebarTitle":"IRIS Cascade","icon":"https://storage.googleapis.com/kombo-assets/integrations/iriscascade/icon.svg","href":"/hris/connectors/iriscascade"},{"title":"iTrent HRIS Integration","sidebarTitle":"iTrent","icon":"https://storage.googleapis.com/kombo-assets/integrations/itrent/icon.svg","href":"/hris/connectors/itrent"},{"title":"Kallidus (Sapling) HRIS Integration","sidebarTitle":"Kallidus (Sapling)","icon":"https://storage.googleapis.com/kombo-assets/integrations/sapling/icon.svg","href":"/hris/connectors/sapling"},{"title":"Kenjo HRIS Integration","sidebarTitle":"Kenjo","icon":"https://storage.googleapis.com/kombo-assets/integrations/kenjo/icon.svg","href":"/hris/connectors/kenjo"},{"title":"Kombo Sandbox HRIS Integration","sidebarTitle":"Kombo Sandbox","icon":"https://storage.googleapis.com/kombo-assets/integrations/sandbox/icon.svg","href":"/hris/connectors/sandbox"},{"title":"Lattice HRIS Integration","sidebarTitle":"Lattice","icon":"https://storage.googleapis.com/kombo-assets/integrations/lattice/icon.svg","href":"/hris/connectors/lattice"},{"title":"Lattice Talent HRIS Integration","sidebarTitle":"Lattice Talent","icon":"https://storage.googleapis.com/kombo-assets/integrations/latticetalent/icon.svg","href":"/hris/connectors/latticetalent"},{"title":"Leapsome HRIS Integration","sidebarTitle":"Leapsome","icon":"https://storage.googleapis.com/kombo-assets/integrations/leapsome/icon.svg","href":"/hris/connectors/leapsome"},{"title":"Loket HRIS Integration","sidebarTitle":"Loket","icon":"https://storage.googleapis.com/kombo-assets/integrations/loket/icon.svg","href":"/hris/connectors/loket"},{"title":"Lucca HRIS Integration","sidebarTitle":"Lucca","icon":"https://storage.googleapis.com/kombo-assets/integrations/lucca/icon.svg","href":"/hris/connectors/lucca"},{"title":"MHR People First HRIS Integration","sidebarTitle":"MHR People First","icon":"https://storage.googleapis.com/kombo-assets/integrations/peoplefirst/icon.svg","href":"/hris/connectors/peoplefirst"},{"title":"Microsoft Azure AD HRIS Integration","sidebarTitle":"Microsoft Azure AD","icon":"https://storage.googleapis.com/kombo-assets/integrations/azuread/icon.svg","href":"/hris/connectors/azuread"},{"title":"Microsoft Entra ID HRIS Integration","sidebarTitle":"Microsoft Entra ID","icon":"https://storage.googleapis.com/kombo-assets/integrations/entraid/icon.svg","href":"/hris/connectors/entraid"},{"title":"Mirus HRIS Integration","sidebarTitle":"Mirus","icon":"https://storage.googleapis.com/kombo-assets/integrations/mirus/icon.svg","href":"/hris/connectors/mirus"},{"title":"Namely HRIS Integration","sidebarTitle":"Namely","icon":"https://storage.googleapis.com/kombo-assets/integrations/namely/icon.svg","href":"/hris/connectors/namely"},{"title":"Nibelis HRIS Integration","sidebarTitle":"Nibelis","icon":"https://storage.googleapis.com/kombo-assets/integrations/nibelis/icon.svg","href":"/hris/connectors/nibelis"},{"title":"Nmbrs HRIS Integration","sidebarTitle":"Nmbrs","icon":"https://storage.googleapis.com/kombo-assets/integrations/nmbrs/icon.svg","href":"/hris/connectors/nmbrs"},{"title":"Officient HRIS Integration","sidebarTitle":"Officient","icon":"https://storage.googleapis.com/kombo-assets/integrations/officient/icon.svg","href":"/hris/connectors/officient"},{"title":"Okta HRIS Integration","sidebarTitle":"Okta","icon":"https://storage.googleapis.com/kombo-assets/integrations/okta/icon.svg","href":"/hris/connectors/okta"},{"title":"Oracle HCM HRIS Integration","sidebarTitle":"Oracle HCM","icon":"https://storage.googleapis.com/kombo-assets/integrations/oraclehcm/icon.svg","href":"/hris/connectors/oraclehcm"},{"title":"OysterHR HRIS Integration","sidebarTitle":"OysterHR","icon":"https://storage.googleapis.com/kombo-assets/integrations/oysterhr/icon.svg","href":"/hris/connectors/oysterhr"},{"title":"Paychex HRIS Integration","sidebarTitle":"Paychex","icon":"https://storage.googleapis.com/kombo-assets/integrations/paychex/icon.svg","href":"/hris/connectors/paychex"},{"title":"Paycom HRIS Integration","sidebarTitle":"Paycom","icon":"https://storage.googleapis.com/kombo-assets/integrations/paycom/icon.svg","href":"/hris/connectors/paycom"},{"title":"Paycor HRIS Integration","sidebarTitle":"Paycor","icon":"https://storage.googleapis.com/kombo-assets/integrations/paycor/icon.svg","href":"/hris/connectors/paycor"},{"title":"PayFit Customer HRIS Integration","sidebarTitle":"PayFit Customer","icon":"https://storage.googleapis.com/kombo-assets/integrations/payfitcustomer/icon.svg","href":"/hris/connectors/payfitcustomer"},{"title":"PayFit Partner HRIS Integration","sidebarTitle":"PayFit Partner","icon":"https://storage.googleapis.com/kombo-assets/integrations/payfitpartner/icon.svg","href":"/hris/connectors/payfitpartner"},{"title":"PayFit Legacy HRIS Integration","sidebarTitle":"PayFit Legacy","icon":"https://storage.googleapis.com/kombo-assets/integrations/payfit/icon.svg","href":"/hris/connectors/payfit"},{"title":"Paylocity HRIS Integration","sidebarTitle":"Paylocity","icon":"https://storage.googleapis.com/kombo-assets/integrations/paylocity/icon.svg","href":"/hris/connectors/paylocity"},{"title":"PeopleHR HRIS Integration","sidebarTitle":"PeopleHR","icon":"https://storage.googleapis.com/kombo-assets/integrations/peoplehr/icon.svg","href":"/hris/connectors/peoplehr"},{"title":"PeopleXD HRIS Integration","sidebarTitle":"PeopleXD","icon":"https://storage.googleapis.com/kombo-assets/integrations/peoplexd/icon.svg","href":"/hris/connectors/peoplexd"},{"title":"Perbility Helix HRIS Integration","sidebarTitle":"Perbility Helix","icon":"https://storage.googleapis.com/kombo-assets/integrations/perbilityhelix/icon.svg","href":"/hris/connectors/perbilityhelix"},{"title":"Personio HRIS Integration","sidebarTitle":"Personio","icon":"https://storage.googleapis.com/kombo-assets/integrations/personio/icon.svg","href":"/hris/connectors/personio"},{"title":"Planday HRIS Integration","sidebarTitle":"Planday","icon":"https://storage.googleapis.com/kombo-assets/integrations/planday/icon.svg","href":"/hris/connectors/planday"},{"title":"Remote HRIS Integration","sidebarTitle":"Remote","icon":"https://storage.googleapis.com/kombo-assets/integrations/remotecom/icon.svg","href":"/hris/connectors/remotecom"},{"title":"rexx systems HRIS Integration","sidebarTitle":"rexx systems","icon":"https://storage.googleapis.com/kombo-assets/integrations/rexx/icon.svg","href":"/hris/connectors/rexx"},{"title":"Rippling HRIS Integration","sidebarTitle":"Rippling","icon":"","href":"/hris/connectors/rippling"},{"title":"Sage HR HRIS Integration","sidebarTitle":"Sage HR","icon":"https://storage.googleapis.com/kombo-assets/integrations/sagehr/icon.svg","href":"/hris/connectors/sagehr"},{"title":"Sage People HRIS Integration","sidebarTitle":"Sage People","icon":"https://storage.googleapis.com/kombo-assets/integrations/sagepeople/icon.svg","href":"/hris/connectors/sagepeople"},{"title":"SAP SuccessFactors HRIS Integration","sidebarTitle":"SAP SuccessFactors","icon":"https://storage.googleapis.com/kombo-assets/integrations/successfactors/icon.svg","href":"/hris/connectors/successfactors"},{"title":"SCIM HRIS Integration","sidebarTitle":"SCIM","icon":"https://storage.googleapis.com/kombo-assets/integrations/scim/icon.svg","href":"/hris/connectors/scim"},{"title":"SD Worx HRIS Integration","sidebarTitle":"SD Worx","icon":"https://storage.googleapis.com/kombo-assets/integrations/sdworx/icon.svg","href":"/hris/connectors/sdworx"},{"title":"Sesame HR HRIS Integration","sidebarTitle":"Sesame HR","icon":"https://storage.googleapis.com/kombo-assets/integrations/sesamehr/icon.svg","href":"/hris/connectors/sesamehr"},{"title":"SFTP HRIS Integration","sidebarTitle":"SFTP","icon":"https://storage.googleapis.com/kombo-assets/integrations/sftp/icon.svg","href":"/hris/connectors/sftp"},{"title":"SFTP Fetch HRIS Integration","sidebarTitle":"SFTP Fetch","icon":"https://storage.googleapis.com/kombo-assets/integrations/sftpfetch/icon.svg","href":"/hris/connectors/sftpfetch"},{"title":"Silae HRIS Integration","sidebarTitle":"Silae","icon":"","href":"/hris/connectors/silae"},{"title":"Simployer HRIS Integration","sidebarTitle":"Simployer","icon":"https://storage.googleapis.com/kombo-assets/integrations/simployer/icon.svg","href":"/hris/connectors/simployer"},{"title":"Skello HRIS Integration","sidebarTitle":"Skello","icon":"https://storage.googleapis.com/kombo-assets/integrations/skello/icon.svg","href":"/hris/connectors/skello"},{"title":"Square HRIS Integration","sidebarTitle":"Square","icon":"https://storage.googleapis.com/kombo-assets/integrations/square/icon.svg","href":"/hris/connectors/square"},{"title":"Sympa HRIS Integration","sidebarTitle":"Sympa","icon":"https://storage.googleapis.com/kombo-assets/integrations/sympa/icon.svg","href":"/hris/connectors/sympa"},{"title":"Tellent HR HRIS Integration","sidebarTitle":"Tellent HR","icon":"https://storage.googleapis.com/kombo-assets/integrations/kiwihr/icon.svg","href":"/hris/connectors/kiwihr"},{"title":"TriNet (Zenefits) HRIS Integration","sidebarTitle":"TriNet (Zenefits)","icon":"https://storage.googleapis.com/kombo-assets/integrations/trinet/icon.svg","href":"/hris/connectors/trinet"},{"title":"TriNet PEO HRIS Integration","sidebarTitle":"TriNet PEO","icon":"https://storage.googleapis.com/kombo-assets/integrations/trinetpeo/icon.svg","href":"/hris/connectors/trinetpeo"},{"title":"UKG Pro HRIS Integration","sidebarTitle":"UKG Pro","icon":"https://storage.googleapis.com/kombo-assets/integrations/ukgpro/icon.svg","href":"/hris/connectors/ukgpro"},{"title":"UKG Pro WFM HRIS Integration","sidebarTitle":"UKG Pro WFM","icon":"https://storage.googleapis.com/kombo-assets/integrations/ukgprowfm/icon.svg","href":"/hris/connectors/ukgprowfm"},{"title":"UKG Ready HRIS Integration","sidebarTitle":"UKG Ready","icon":"https://storage.googleapis.com/kombo-assets/integrations/ukgready/icon.svg","href":"/hris/connectors/ukgready"},{"title":"VEDA HR Suite HRIS Integration","sidebarTitle":"VEDA HR Suite","icon":"https://storage.googleapis.com/kombo-assets/integrations/veda/icon.svg","href":"/hris/connectors/veda"},{"title":"Visma Peple HRIS Integration","sidebarTitle":"Visma Peple","icon":"https://storage.googleapis.com/kombo-assets/integrations/peple/icon.svg","href":"/hris/connectors/peple"},{"title":"Visma Raet - Youforce HRIS Integration","sidebarTitle":"Visma Raet - Youforce","icon":"https://storage.googleapis.com/kombo-assets/integrations/youforce/icon.svg","href":"/hris/connectors/youforce"},{"title":"Visma YouServe HRIS Integration","sidebarTitle":"Visma YouServe","icon":"https://storage.googleapis.com/kombo-assets/integrations/youserve/icon.svg","href":"/hris/connectors/youserve"},{"title":"Workday HRIS Integration","sidebarTitle":"Workday","icon":"https://storage.googleapis.com/kombo-assets/integrations/workday/icon.svg","href":"/hris/connectors/workday"},{"title":"Workday Custom Report SFTP HRIS Integration","sidebarTitle":"Workday Custom Report SFTP","icon":"https://storage.googleapis.com/kombo-assets/integrations/workdaycustomreportsftp/icon.svg","href":"/hris/connectors/workdaycustomreportsftp"},{"title":"Workday Custom Reports HRIS Integration","sidebarTitle":"Workday Custom Reports","icon":"https://storage.googleapis.com/kombo-assets/integrations/workdaycustomreport/icon.svg","href":"/hris/connectors/workdaycustomreport"},{"title":"workforce.com HRIS Integration","sidebarTitle":"workforce.com","icon":"https://storage.googleapis.com/kombo-assets/integrations/workforcecom/icon.svg","href":"/hris/connectors/workforcecom"},{"title":"Zellis HRIS Integration","sidebarTitle":"Zellis","icon":"https://storage.googleapis.com/kombo-assets/integrations/zellis/icon.svg","href":"/hris/connectors/zellis"},{"title":"Zelt HRIS Integration","sidebarTitle":"Zelt","icon":"https://storage.googleapis.com/kombo-assets/integrations/zelt/icon.svg","href":"/hris/connectors/zelt"},{"title":"Zoho People HRIS Integration","sidebarTitle":"Zoho People","icon":"https://storage.googleapis.com/kombo-assets/integrations/zohopeople/icon.svg","href":"/hris/connectors/zohopeople"}]},{"title":"FAQ","icon":"question","href":"/hris/faq"},{"title":"Important Changes","icon":"bell","href":"/hris/important-changes"}]},{"group":"Features","icon":"cubes","pages":[{"title":"Real-time Data","icon":"bolt","href":"/hris/features/real-time-data"},{"title":"Create and read absences","icon":"tag","href":"/hris/features/creating-absences"},{"title":"Create Employee","icon":"user-plus","href":"/hris/features/create-employee"},{"title":"Update Employee","sidebarTitle":"Update Employee","icon":"user-pen","tag":"BETA","href":"/hris/features/update-employee"},{"title":"Update Employment","sidebarTitle":"Update Employment","icon":"briefcase","tag":"BETA","href":"/hris/features/update-employment"},{"title":"Rehire Employee","sidebarTitle":"Rehire Employee","icon":"user-check","tag":"BETA","href":"/hris/features/rehire-employee"},{"title":"Data Explorer","icon":"table","href":"/hris/features/data-explorer"},{"title":"Time and Attendance","icon":"clock","href":"/hris/features/time-and-attendance"},{"title":"Performance data","icon":"award","href":"/hris/features/performance-data"},{"title":"Staffing entities","icon":"briefcase","href":"/hris/features/staffing-entities"},{"group":"Data filtering","icon":"filter","pages":[{"title":"Introduction","icon":"filter","href":"/hris/features/filtering/introduction"},{"title":"Data deletion","icon":"shield-halved","href":"/hris/features/filtering/data-policy"}]},{"title":"SFTP connections","icon":"folder","href":"/hris/features/sftp"},{"title":"SCIM Integrations","icon":"rotate","href":"/hris/features/scim"},{"title":"Setup Flow","icon":"sliders","href":"/hris/features/setup-flow/introduction"},{"title":"Custom Fields","icon":"square-plus","href":"/hris/features/custom-fields"},{"title":"Advanced Mappings","icon":"brackets-curly","href":"/hris/features/advanced-mappings"},{"group":"Remapping","icon":"shuffle","pages":[{"title":"Introduction","icon":"shuffle","href":"/hris/features/remapping/introduction"},{"title":"Remapping simple fields","icon":"sliders","href":"/hris/features/remapping/simple-remapping"},{"title":"Remapping enum fields","icon":"list-check","href":"/hris/features/remapping/enum-remapping"},{"title":"Remapping date fields","icon":"calendar-days","href":"/hris/features/remapping/date-remapping"},{"title":"Remapping address fields","icon":"map","href":"/hris/features/remapping/struct-remapping"},{"title":"Remapping reference fields","icon":"link","href":"/hris/features/remapping/reference-remapping"},{"title":"Remapping array fields","icon":"brackets-curly","href":"/hris/features/remapping/array-remapping"},{"title":"Kombo default fallback","icon":"rotate-left","href":"/hris/features/remapping/kombo-default-fallback"}]},{"title":"Logs","icon":"scroll","href":"/hris/features/logs"},{"title":"Issues","icon":"triangle-exclamation","href":"/hris/features/issues"},{"title":"Issue types","icon":"triangle-exclamation","href":"/hris/features/issue-types"},{"title":"Deletion Policy","icon":"trash","href":"/hris/features/deletion-policy"},{"title":"Passthrough API","icon":"right-left","href":"/hris/features/passthrough-api"},{"title":"Komboman","icon":"terminal","href":"/hris/features/komboman"},{"title":"Extend write endpoints","icon":"wand-magic-sparkles","href":"/hris/features/remote-fields"},{"title":"Scopes","icon":"bullseye","href":"/hris/features/scopes"},{"title":"Audit Logs","icon":"clipboard-list","href":"/hris/features/audit-logs"}]},{"group":"Guides","icon":"book-open","pages":[{"group":"Kombo Connect","icon":"link","pages":[{"title":"Introduction","icon":"link","href":"/hris/guides/connect/introduction"},{"title":"Manual setup","icon":"wrench","href":"/hris/guides/connect/manual-setup"},{"title":"Magic links","icon":"wand-magic-sparkles","href":"/hris/guides/connect/magic-links"},{"title":"Embedded flow","icon":"puzzle-piece","href":"/hris/guides/connect/embedded-flow"},{"title":"Reconnecting an integration","icon":"arrow-rotate-right","href":"/hris/guides/connect/reconnection"}]},{"title":"How Kombo Syncs Data","icon":"arrows-rotate","href":"/hris/guides/sync"},{"title":"Error Handling","icon":"bug-slash","href":"/guides/errors"},{"title":"Concurrency Limiting","description":"Concurrency limiting caps simultaneous in-flight unified actions per integration, giving you fast feedback instead of slow timeouts.","icon":"gauge-max","href":"/hris/guides/concurrency-limiting"},{"title":"SFTP self-serve setup","icon":"sliders","href":"/hris/guides/sftp-self-serve"},{"title":"Webhooks","description":"Kombo sends you webhooks so that you don't have to poll our API for changes.","icon":"bolt","href":"/hris/guides/webhooks"},{"title":"Upstream webhooks","icon":"cloud-arrow-down","href":"/hris/guides/upstream-webhooks"},{"title":"Integration States","icon":"traffic-light","href":"/hris/guides/integration-states"},{"title":"Implementing New Tools","icon":"toolbox","href":"/hris/guides/implementing-new-tools"},{"title":"Environments","icon":"building","href":"/hris/guides/environments"},{"title":"Partner Credentials","icon":"handshake","href":"/hris/guides/partner-credentials"},{"title":"Static IPs","icon":"shield-check","href":"/hris/guides/static-ips"},{"group":"Troubleshooting","icon":"bug","pages":[{"title":"How to troubleshoot issues with Kombo","icon":"life-ring","href":"/hris/guides/debugging/introduction"},{"title":"Troubleshoot connection flow problems","icon":"link-slash","href":"/hris/guides/debugging/debug-connection-flow"},{"title":"Investigate failing actions","icon":"bolt","href":"/hris/guides/debugging/investigate-failing-actions"},{"title":"Diagnosing missing or incorrect data","icon":"magnifying-glass","href":"/hris/guides/debugging/debug-data-issues"}]}]},{"group":"HRIS API Reference","icon":"book","pages":[{"group":"Employees","icon":"users","pages":[{"title":"Get employees","openapi":"GET /hris/employees","href":"/hris/v1/get-employees"},{"title":"Get employments","openapi":"GET /hris/employments","href":"/hris/v1/get-employments"},{"group":"Create employee","pages":[{"title":"Get employee form","openapi":"GET /hris/employees/form","href":"/hris/v1/get-employees-form"},{"title":"Create employee with form","openapi":"POST /hris/employees/form","href":"/hris/v1/post-employees-form"}]},{"group":"Update employee","tag":"BETA","pages":[{"title":"Get personal data form","sidebarTitle":"Get personal data form","openapi":"GET /hris/employees/{employee_id}/form/personal_data","href":"/hris/v1/get-employees-employee-id-form-personal-data"},{"title":"Update employee personal data","sidebarTitle":"Update personal data","openapi":"PATCH /hris/employees/{employee_id}/form/personal_data","href":"/hris/v1/patch-employees-employee-id-form-personal-data"}]},{"group":"Update employment","tag":"BETA","pages":[{"title":"Get compensation form","sidebarTitle":"Get compensation form","openapi":"GET /hris/employments/{employment_id}/form/compensation","href":"/hris/v1/get-employments-employment-id-form-compensation"},{"title":"Update employment compensation","sidebarTitle":"Update compensation","openapi":"PATCH /hris/employments/{employment_id}/form/compensation","href":"/hris/v1/patch-employments-employment-id-form-compensation"},{"title":"Get job form","sidebarTitle":"Get job form","openapi":"GET /hris/employments/{employment_id}/form/job","href":"/hris/v1/get-employments-employment-id-form-job"},{"title":"Update employment job","sidebarTitle":"Update job","openapi":"PATCH /hris/employments/{employment_id}/form/job","href":"/hris/v1/patch-employments-employment-id-form-job"}]},{"group":"Rehire employee","tag":"BETA","pages":[{"title":"Get rehire form","sidebarTitle":"Get rehire form","openapi":"GET /hris/employees/{employee_id}/form/rehire","href":"/hris/v1/get-employees-employee-id-form-rehire"},{"title":"Rehire employee","openapi":"POST /hris/employees/{employee_id}/form/rehire","href":"/hris/v1/post-employees-employee-id-form-rehire"}]}]},{"group":"Organization","icon":"building","pages":[{"title":"Get groups","openapi":"GET /hris/groups","href":"/hris/v1/get-groups"},{"title":"Get legal entities","openapi":"GET /hris/legal-entities","href":"/hris/v1/get-legal-entities"},{"title":"Get work locations","openapi":"GET /hris/locations","href":"/hris/v1/get-locations"}]},{"group":"Employee Documents","icon":"folder-open","pages":[{"title":"Get employee document categories","openapi":"GET /hris/employee-document-categories","href":"/hris/v1/get-employee-document-categories"},{"title":"Add document to employee","openapi":"POST /hris/employees/{employee_id}/documents","href":"/hris/v1/post-employees-employee-id-documents"}]},{"group":"Time off","icon":"calendar-minus","pages":[{"title":"Get absences","openapi":"GET /hris/absences","href":"/hris/v1/get-absences"},{"title":"Get absence types","openapi":"GET /hris/absence-types","href":"/hris/v1/get-absence-types"},{"title":"Get time off balances","openapi":"GET /hris/time-off-balances","href":"/hris/v1/get-time-off-balances"},{"title":"Create absence","openapi":"POST /hris/absences","href":"/hris/v1/post-absences"},{"title":"Delete absence","openapi":"DELETE /hris/absences/{absence_id}","href":"/hris/v1/delete-absences-absence-id"}]},{"group":"Time and attendance","icon":"clock","pages":[{"title":"Get timesheets","openapi":"GET /hris/timesheets","href":"/hris/v1/get-timesheets"}]},{"group":"Performance data","icon":"award","pages":[{"title":"Get performance review cycles","openapi":"GET /hris/performance-review-cycles","href":"/hris/v1/get-performance-review-cycles"},{"title":"Get performance reviews","openapi":"GET /hris/performance-reviews","href":"/hris/v1/get-performance-reviews"}]},{"group":"Staffing entities","icon":"briefcase","pages":[{"title":"Get staffing entities","openapi":"GET /hris/staffing-entities","href":"/hris/v1/get-staffing-entities"}]},{"group":"Skills","icon":"star","pages":[{"title":"Get skills","openapi":"GET /hris/skills","href":"/hris/v1/get-skills"},{"title":"Upsert managed skill","openapi":"POST /hris/skills","href":"/hris/v1/post-skills"},{"title":"Get employee skill proficiency ratings","openapi":"GET /hris/skill-proficiency-ratings","href":"/hris/v1/get-skill-proficiency-ratings"},{"title":"Upsert employee skill proficiency rating","openapi":"POST /hris/skill-proficiency-ratings","href":"/hris/v1/post-skill-proficiency-ratings"},{"title":"Upsert staffing entity skill expectation","openapi":"POST /hris/staffing-entities/{staffing_entity_id}/skills","href":"/hris/v1/post-staffing-entities-staffing-entity-id-skills"}]}]},{"group":"Payroll API Reference","icon":"file-invoice","tag":"NEW","pages":[{"group":"Payslips","icon":"receipt","tag":"BETA","pages":[{"title":"Payslips","openapi":"GET /hris/payslips","href":"/hris/v1/get-payslips"}]},{"group":"Pay runs","icon":"money-bill-wave","tag":"BETA","pages":[{"title":"Pay Runs","openapi":"GET /hris/pay-runs","href":"/hris/v1/get-pay-runs"}]},{"group":"Pay groups","icon":"layer-group","tag":"BETA","pages":[{"title":"Pay Groups","openapi":"GET /hris/pay-groups","href":"/hris/v1/get-pay-groups"}]}]},{"group":"General API Reference","pages":[{"group":"Kombo Connect","icon":"link","pages":[{"title":"Create connection link","openapi":"POST /connect/create-link","href":"/hris/v1/post-connect-create-link"},{"title":"Get integration by token","openapi":"GET /connect/integration-by-token/{token}","href":"/hris/v1/get-connect-integration-by-token-token"},{"title":"Activate integration (optional)","openapi":"POST /connect/activate-integration","href":"/hris/v1/post-connect-activate-integration"},{"title":"Create reconnection link","openapi":"POST /integrations/{integration_id}/relink","href":"/hris/v1/post-integrations-integration-id-relink"},{"title":"Create Setup Flow link","openapi":"POST /integrations/{integration_id}/setup-link","href":"/hris/v1/post-integrations-integration-id-setup-link"},{"title":"Get tools","openapi":"GET /tools/{category}","href":"/hris/v1/get-tools-category"}]},{"group":"Integrations","icon":"plug","pages":[{"title":"Get integration details","openapi":"GET /integrations/{integration_id}","href":"/hris/v1/get-integrations-integration-id"},{"title":"Set integration enabled","openapi":"PUT /integrations/{integration_id}/enabled","href":"/hris/v1/put-integrations-integration-id-enabled"},{"title":"Delete integration","openapi":"DELETE /integrations/{integration_id}","href":"/hris/v1/delete-integrations-integration-id"},{"title":"Trigger sync","openapi":"POST /force-sync","href":"/hris/v1/post-force-sync"}]},{"group":"Filtering","icon":"filter","pages":[{"title":"Create provisioning setup link (deprecated)","openapi":"POST /hris/provisioning-groups/{group_id}/setup-links","href":"/hris/v1/post-provisioning-groups-group-id-setup-links"}]},{"group":"Custom Fields","icon":"square-plus","pages":[{"title":"Get custom fields with current mappings","openapi":"GET /integrations/{integration_id}/custom-fields","href":"/hris/v1/get-integrations-integration-id-custom-fields"}]},{"group":"Other","icon":"ellipsis","pages":[{"title":"Check API key","openapi":"GET /check-api-key","href":"/hris/v1/get-check-api-key"},{"title":"Send passthrough request","openapi":"POST /passthrough/{tool}/{api}","href":"/hris/v1/post-passthrough-tool-api"}]}]},{"group":"DATEV","icon":"file-lines","pages":[{"title":"Getting Started","icon":"plug","href":"/hris/datev/datev-integration"},{"title":"Get DATEV user info","openapi":"GET /custom/datev/userinfo","href":"/hris/v1/get-datev-userinfo"},{"group":"DATEV LAUDS exclusive endpoints","icon":"key","pages":[{"title":"Get available salary types (Lohnarten) from DATEV.","openapi":"GET /custom/datev/salary-types","href":"/hris/v1/get-custom-datev-salary-types"},{"title":"Get available health insurers from DATEV.","openapi":"GET /custom/datev/health-insurances","href":"/hris/v1/get-custom-datev-health-insurances"}]},{"group":"DATEV Payroll","icon":"file-invoice","pages":[{"title":"Verify ASCII write is enabled","openapi":"GET /custom/datev/check-write-permission","href":"/hris/v1/get-datev-check-write-permission"},{"title":"Write raw DATEV ASCII file","openapi":"POST /custom/datev/passthrough","href":"/hris/v1/post-datev-passthrough"},{"title":"Get DATEV system information","openapi":"GET /custom/datev/system-information","href":"/hris/v1/get-datev-system-information"},{"title":"Get DATEV data pushes","openapi":"GET /custom/datev/data-pushes","href":"/hris/v1/get-datev-data-pushes"}]},{"group":"DATEV Documents (Payslips)","icon":"folder","pages":[{"title":"Verify service is enabled","openapi":"GET /custom/datev/check-document-permission","href":"/hris/v1/get-datev-check-document-permission"},{"title":"Retrieve available documents","openapi":"GET /custom/datev/available-documents","href":"/hris/v1/get-datev-available-documents"},{"title":"Download Employee Document","openapi":"POST /custom/datev/employees/{employee_id}/download-document","href":"/hris/v1/post-datev-employees-employee-id-download-document"},{"title":"Download Company Document","openapi":"POST /custom/datev/download-document","href":"/hris/v1/post-datev-download-document"}]},{"group":"DATEV eAU","icon":"file-medical","pages":[{"title":"Process Description","icon":"file-medical","href":"/hris/datev/datev-eau"},{"title":"eAU examples","icon":"book","href":"/hris/datev/datev-eau-examples"},{"title":"Verify service is enabled","openapi":"GET /custom/datev/check-eau-permission","href":"/hris/v1/get-datev-check-eau-permission"},{"title":"Create eAU Request","openapi":"POST /custom/datev/employees/{employee_id}/eau-requests","href":"/hris/v1/post-datev-employees-employee-id-eau-requests"},{"title":"Query the status of the eAU request","openapi":"GET /custom/datev/eau-requests/{eau_id}","href":"/hris/v1/get-datev-eau-requests-eau-id"},{"title":"Delete eAU request","openapi":"DELETE /custom/datev/eau-requests/{eau_id}","href":"/hris/v1/delete-datev-eau-requests-eau-id"}]}]}]},{"anchor":"LMS","icon":"graduation-cap","pages":[{"title":"LMS","href":"/lms/introduction"}]},{"anchor":"ATS","icon":"briefcase","pages":[{"title":"ATS","href":"/ats/introduction"}]},{"anchor":"ATS Assessment \u0026 Background Check","icon":"ballot-check","pages":[{"title":"ATS Assessment \u0026 Background Check","href":"/assessment/introduction"}]},{"anchor":"AI Apply","icon":"browser","pages":[{"title":"AI Apply","href":"/ai-apply/introduction"}]},{"anchor":"Changelog","icon":"book","href":"https://changelog.kombo.dev"},{"anchor":"Status","icon":"wave-pulse","href":"https://status.kombo.dev"}]},{"tab":"Help Center","icon":"life-ring","pages":[{"title":"Help Center","href":"/help-center"}]}]},"basePath":"","title":"SFTP self-serve setup - Kombo","buildId":"dpl_DeHjVRGfFnhYQwHnfC2pjeXXv8h9","deploymentId":"dpl_DeHjVRGfFnhYQwHnfC2pjeXXv8h9","dynamics":["a74be98ba7"],"chunks":["zoom-image-lightbox-BG6oD64b.js","lightbox-handle-r17bVUz3.js"]}