Good to know
- We initially implemented two seperate DATEV integrations for DATEV LODAS and DATEV Lohn und Gehalt. Those we now consider legacy integrations. We recommend using our new DATEV integration.
- The legacy DATEV integrations are write-only. Back then DATEV didn’t provide an API to read data. We since implemented a new DATEV integration that allows reading data.
- Sending data to DATEV works file-based
Supported endpoints
- Update employee
- Set compensations
- Create absence
- Prepare DATEV Payroll
- Push general data to DATEV
- Push payroll data to DATEV
- Get DATEV data pushes
Creating a test integration
To develop your integration with Kombo, you must connect DATEV at least a few times. Here is everything you need to know about that. Call our Create link endpoint. Specify the tooldatev and enter the remote_environment SANDBOX. The other parameters are up to you. This will create a link to connect a DATEV sandbox account. Find the credentials for that here:
In Kombo Connect
- Consultant ID (Berater Nummer):
455148 - Client ID (Mandanten Nummer):
1
In the DATEV popup
- Select login with DATEV Benutzerkonto
- Username:
Test6 - Password:
bTomu4cTKg
Back in Kombo Connect
- Gehalt Lohnart:
100- This is the salary type that will be used to create fixed compensations (Festbezüge).
Employees
Updating employees
You can submit all primary employee data to DATEV with our Update employee endpoint. You might ask yourself which employee ID you should use for the update operations. Unfortunately, this is a bit tricky as the DATEV integration is write-only.Specifying the employee ID
Our “update employee” endpoint (and all other DATEV-related endpoints) supports usingremote:<id-in-datev> to reference an employee we don’t know about in our system.
Our recommendation for you is that you let your users enter the DATEV Employee ID (Personalnummer) in a field. Each ID must be numeric and 0 < X < 100000. Also, make sure that the IDs are unique in your database.
Be careful when using these IDs because it is possible to overwrite existing
entries in DATEV, as we can’t read data.
Creating employees
DATEV does not differentiate between updates and creates. Additionally, we don’t know if you want to update an existing entry or create a new entry. Therefore, you will use the same Update employee endpoint for editing and creating employees.Setting compensations
DATEV allows specifying hourly and monthly compensations next to one-time payments, which are described later. You can use our Set compensations endpoint to upsert compensations for an employee. It is important to note that we will end all other compensations for the effective date that would be valid otherwise. You can only specify one monthly payment and one hourly wage. If you would like to delete it, don’t submit it. For most use cases, you might only want to specify one compensation. Setting hourly wages is only necessary if an employee is paid by the hour. When creating a new employee, use a unique employee ID. This can turn out more tricky than expected because you also can’t read from DATEV. Our best practice solution is to specify an offset, e.g., 10000, for your ID generation. That means existing employees might have numbers from 1 to 9999, and you will create the following employees in DATEV with 10001, etc.Absences
You might want to submit absences to DATEV for payroll calculations. Use our Create absence endpoint. Use theremote: prefix for the employee ID. Only the absence type and the start and end date can be specified. Receive a list of all absence types available in DATEV with our Get absence types endpoint.
Payroll
Use the Prepare DATEV Payroll endpoint to submit one-time payments specific to one payroll run. Our API differentiates between hourly payments and fixed payments. For example, you would submit overtime hours ashourly_payments and a one-time-bonus as fixed_payments.
To specify the Lohnart, you need to request it from your customer first because the Lohnart (compensation type) can be freely configured in DATEV. Each company might use a different Lohnart to submit, for example, hours worked.
This endpoint works as an upsert endpoint too. That means specifying the payroll data for an employee will replace all their current entries and create new ones. Kombo is also keeping track of what was already sent to DATEV and correcting that. Treat this endpoint as you would treat any regular PUT endpoint.
In DATEV,
hourly_payments will be added with the Bearbeitungsschlüssel 1,
and fixed_payments will be added with the Bearbeitungsschlüssel 2 (Fixed,
gross). DATEV has a confusing concept around Bearbeitungsschlüssel. You
need to specify a Lohnart that is compatible with the payment type.Submitting the data to DATEV
Because DATEV uses file-based imports, you mustPOST our push data endpoints to submit the data that we aggregated to be sent to DATEV. Please note that we will create one or more files that must manually be imported by the DATEV user when you call this endpoint. Don’t call it after every change, but before preparing payroll or after finishing changes.
- Call our Push General Data endpoint to submit all updates regarding employees, absences, and compensations (all not-payroll-run-related changes).
- Call our Push Payroll Data endpoint to submit all payroll-run specific changes. This will submit all the data you posted to the Prepare Payroll Endpoint.
Please note that we can’t read if the payroll run was already completed in
DATEV for the specified month, so it might be possible that you submit data
that can’t be taken into account anymore. In this case, your customers’ tax
consultant should look into the necessary corrections.
Importing data in DATEV
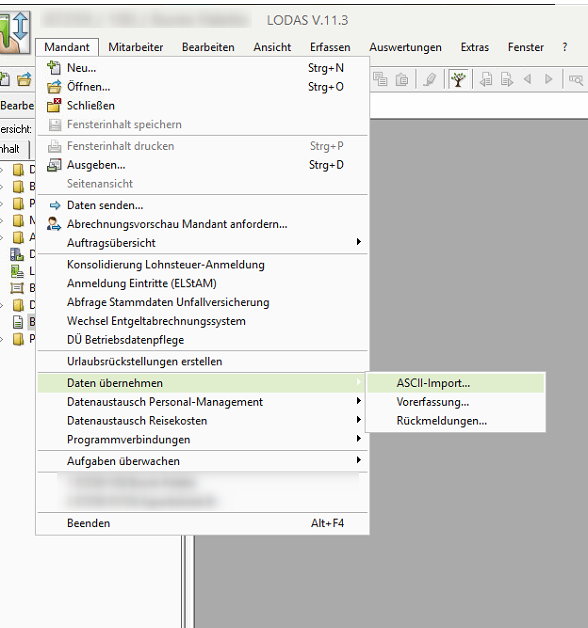
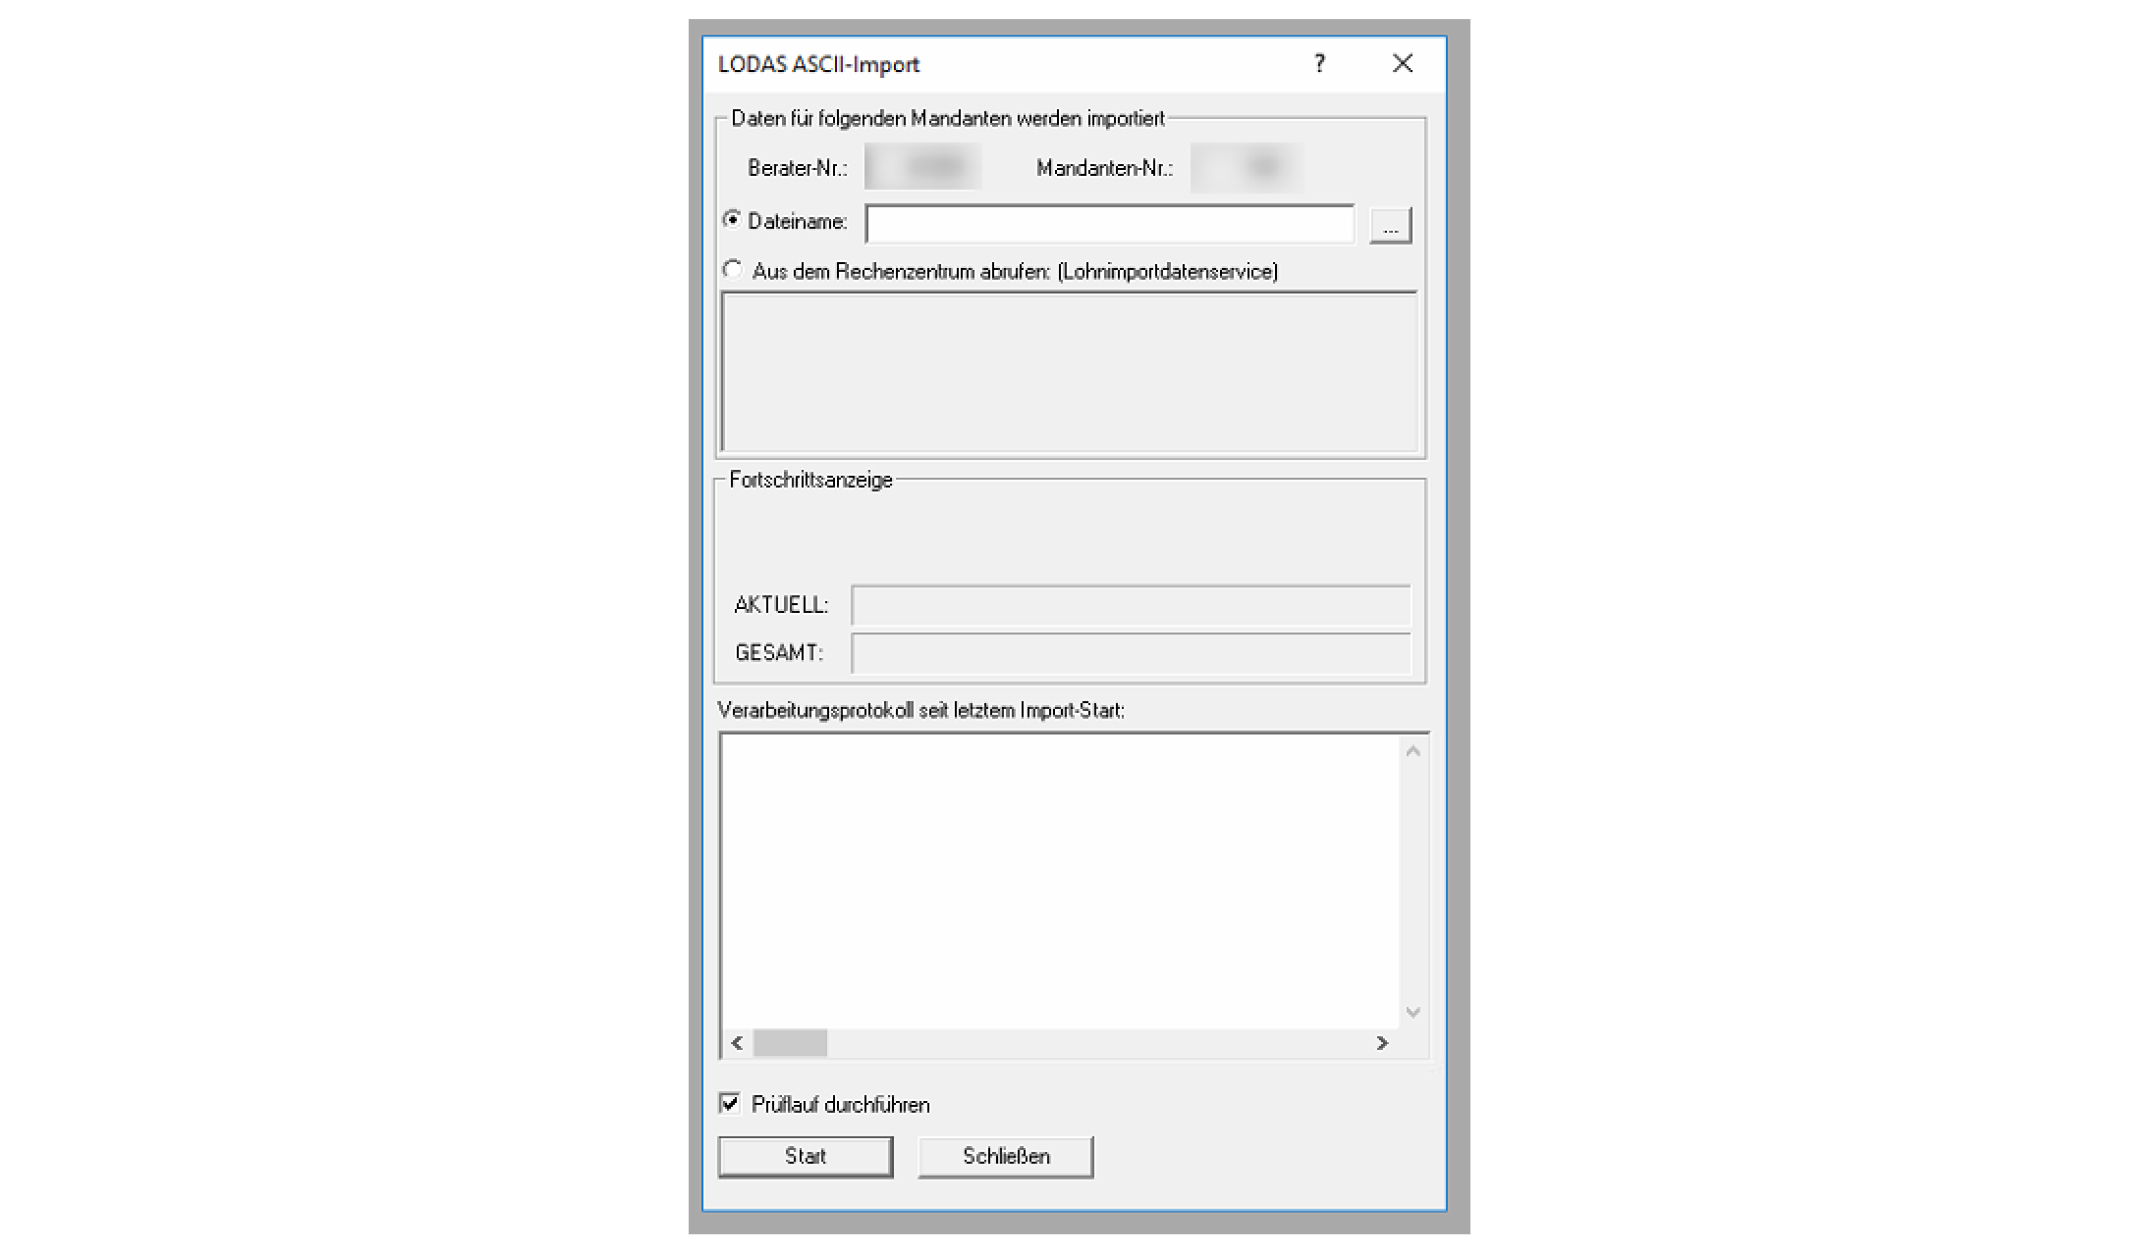
Your customer tax consultant/employee might already know this, but here are the steps to import files. First, open theDaten Übernehmen function and select ASCII-Import (the actual files are not in ASCII)

Aus dem Rechenzentrum abrufen (Lohndatenimportservice). Now the user should be able to see all the files that were submitted.
