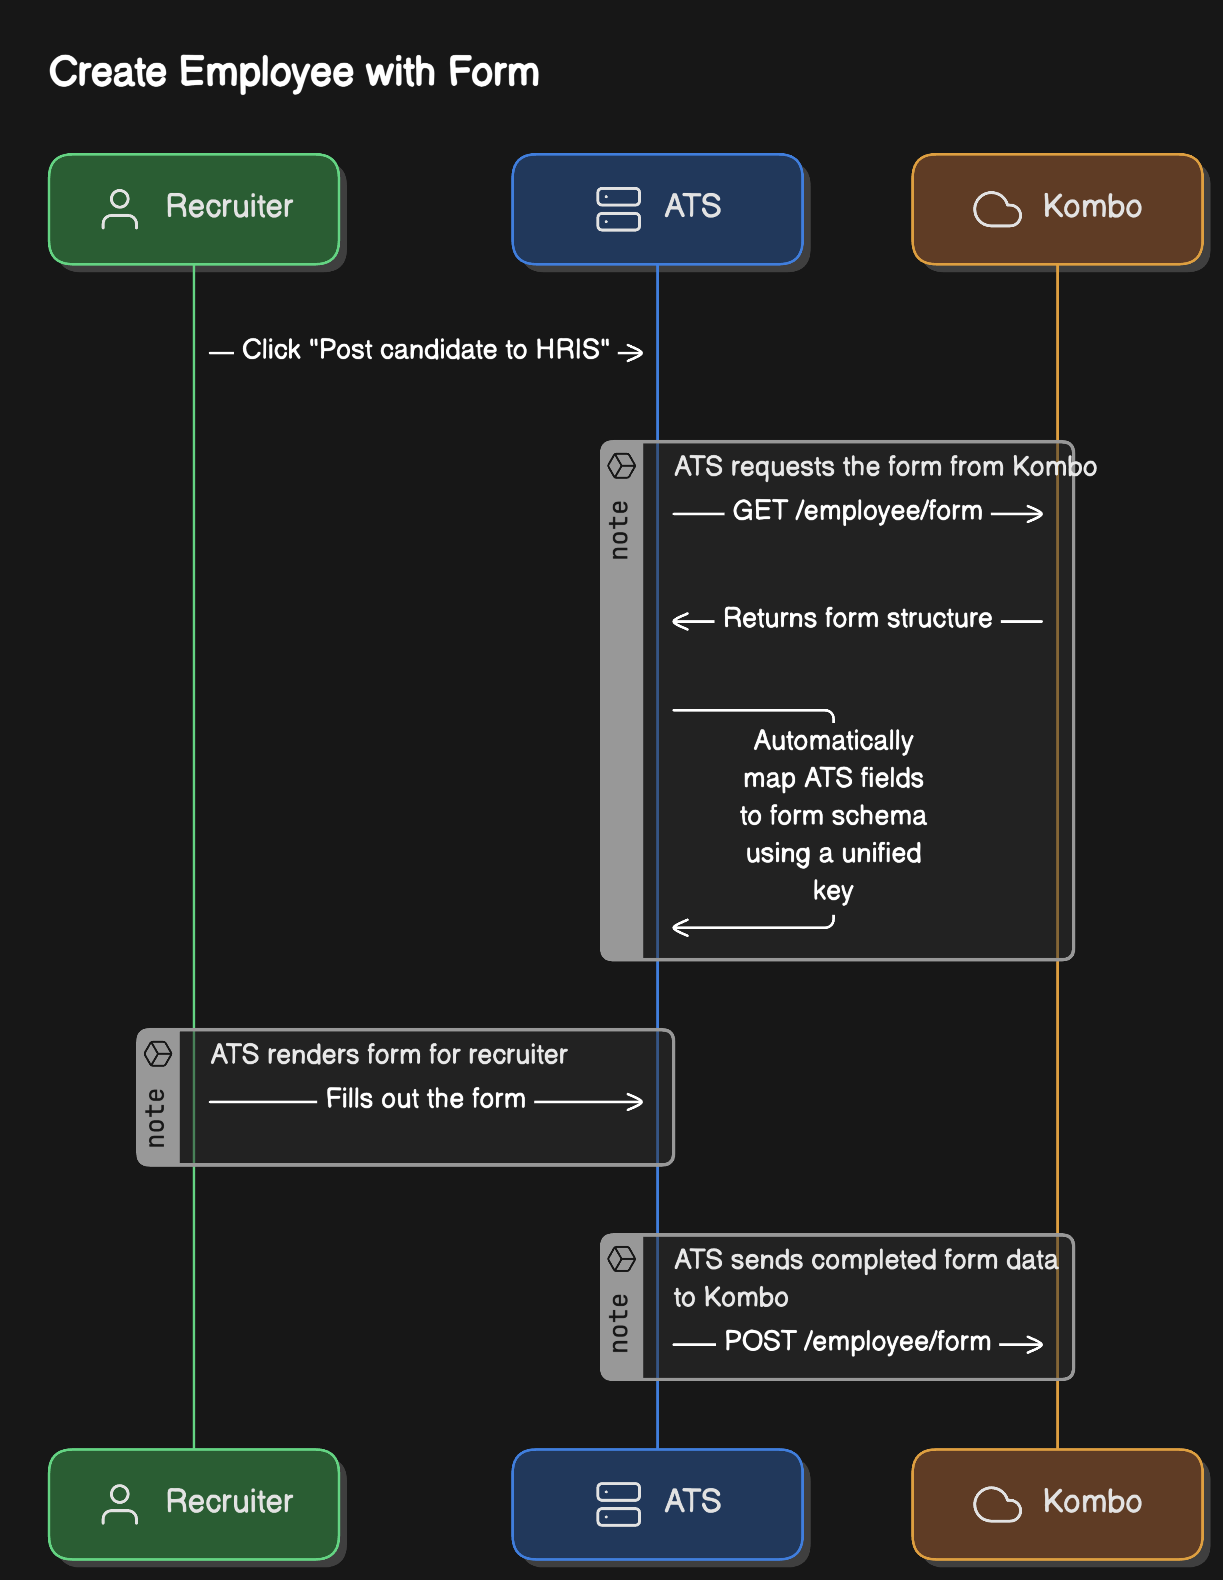
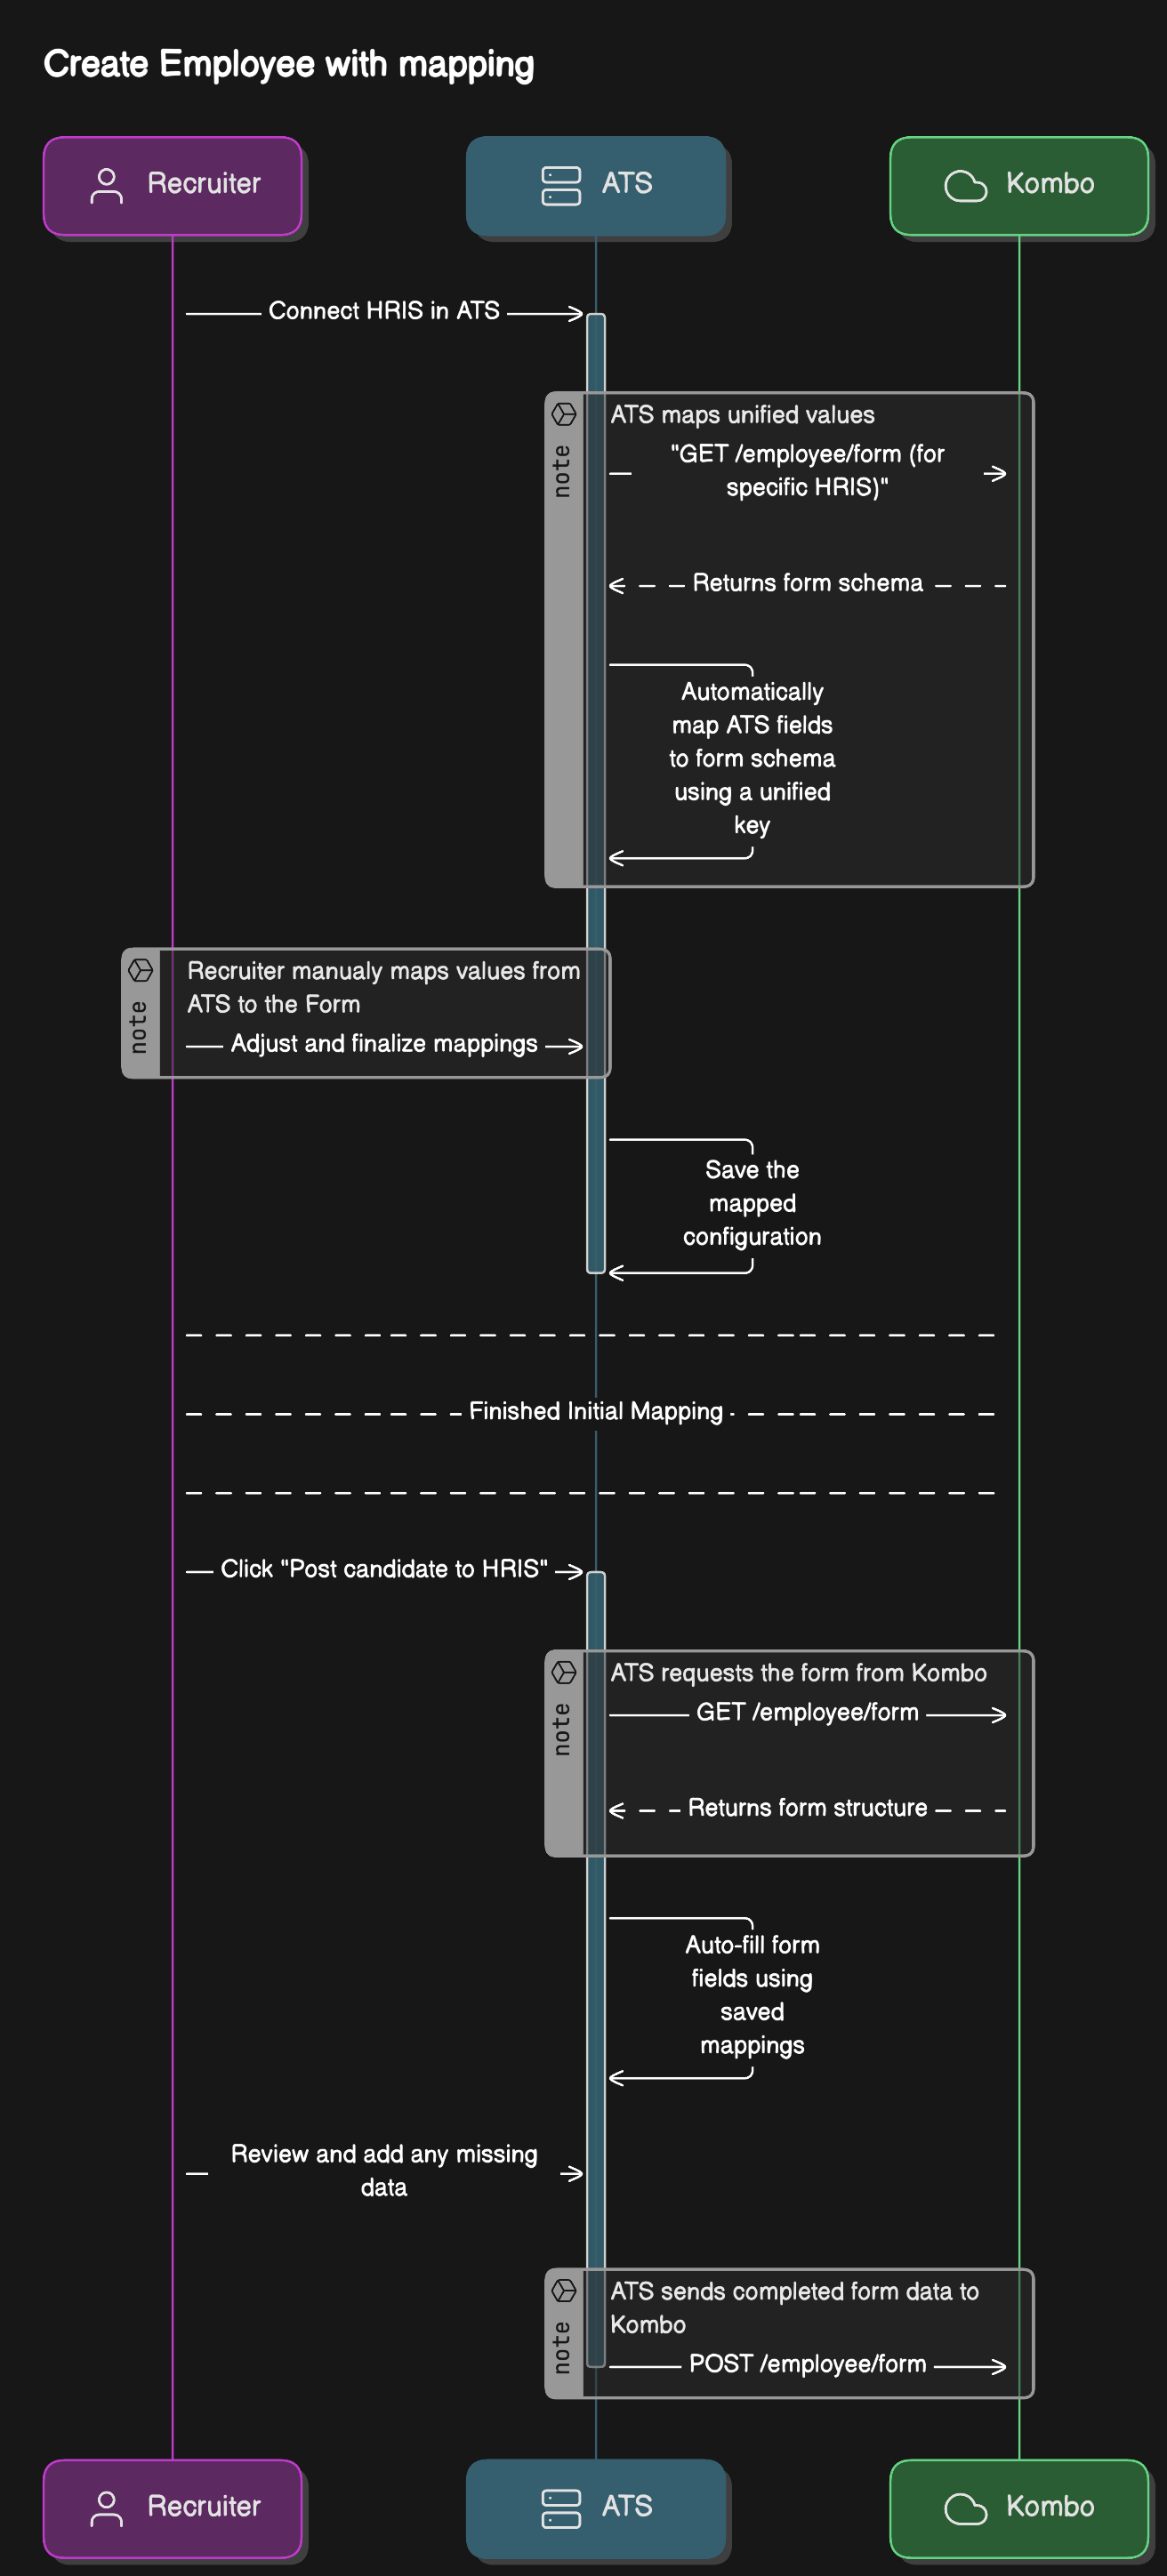
> ## Documentation Index
> Fetch the complete documentation index at: https://docs.kombo.dev/llms.txt
> Use this file to discover all available pages before exploring further.

# Creating Employees (v2)

> Learn how to create employee records in connected HRIS via Kombo.

## Overview

Kombo's **Create Employee** feature streamlines onboarding by enabling ATS platforms to automatically create employee records in connected HRIS.

Rather than manually entering data, this integration dynamically identifies and retrieves each HRIS's specific requirements for creating employee records (the data schema), letting your platform easily send correctly formatted employee data directly from the ATS to the HRIS–creating new employee records.

### Benefits

* **Consistent data structure** across diverse/customized HR systems.
* **Automated field mapping** associates fields in ATS with fields in HRIS, reducing manual efforts and errors.
* **Consistent and Validated Data:** Ensures data is accurate, complete, and validated, reducing onboarding errors.

### High-level Workflow

To create an employee:

1. **Connect HRIS** – Ensure an HRIS connection is set up via [Kombo Connect](/hris/guides/connect/introduction).
2. **Fetch Schema** – Retrieve fields required by the connected HRIS to create an employee.
3. **Map Fields & Capture Data** – Pre-populate fields from your ATS data and capture any missing data in your UI.
4. **Submit Employee Data** – Push validated employee data to create employee record in connected HRIS.

<Accordion title="Flowcharts of Workflow">
  <Tabs>
    <Tab title="Create Employee">
      <Frame>
        <img src="https://mintcdn.com/kombo/wgjPsGjJZE2PEhQP/images/create-employee-with-form.png?fit=max&auto=format&n=wgjPsGjJZE2PEhQP&q=85&s=14686b1eb4b59c3b1b5338375abfe894" alt="create-employee-form.png" width="1223" height="1580" data-path="images/create-employee-with-form.png" />
      </Frame>
    </Tab>

    <Tab title="Create Employee with Mapping">
      <Frame>
        <img src="https://mintcdn.com/kombo/wgjPsGjJZE2PEhQP/images/create-employee-mapping-flow.png?fit=max&auto=format&n=wgjPsGjJZE2PEhQP&q=85&s=350ad386a0b27939dd4a90ab3be6389e" alt="create-employee-mapping.png" width="1312" height="2897" data-path="images/create-employee-mapping-flow.png" />
      </Frame>
    </Tab>
  </Tabs>
</Accordion>

### Relevant API endpoints

<CardGroup cols={2}>
  <Card title="Get employee form" icon="align-left" href="/hris/v1/get-employees-form">
    Get the form definition that you can render on your frontend.
  </Card>

  <Card title="Create employee with form" icon="user-plus" href="/hris/v1/post-employees-form">
    Post the data that you collected from the form to create an employee.
  </Card>
</CardGroup>

## Implementation Steps

<Steps>
  <Step title="Fetching the Form Schema">
    <div className="grid grid-cols-1 gap-4">
      <div>
        **Endpoint:**

        `GET` [https://api.kombo.dev/v1/hris/employees/form](https://api.kombo.dev/v1/hris/employees/form)

        <br />

        **Response:**

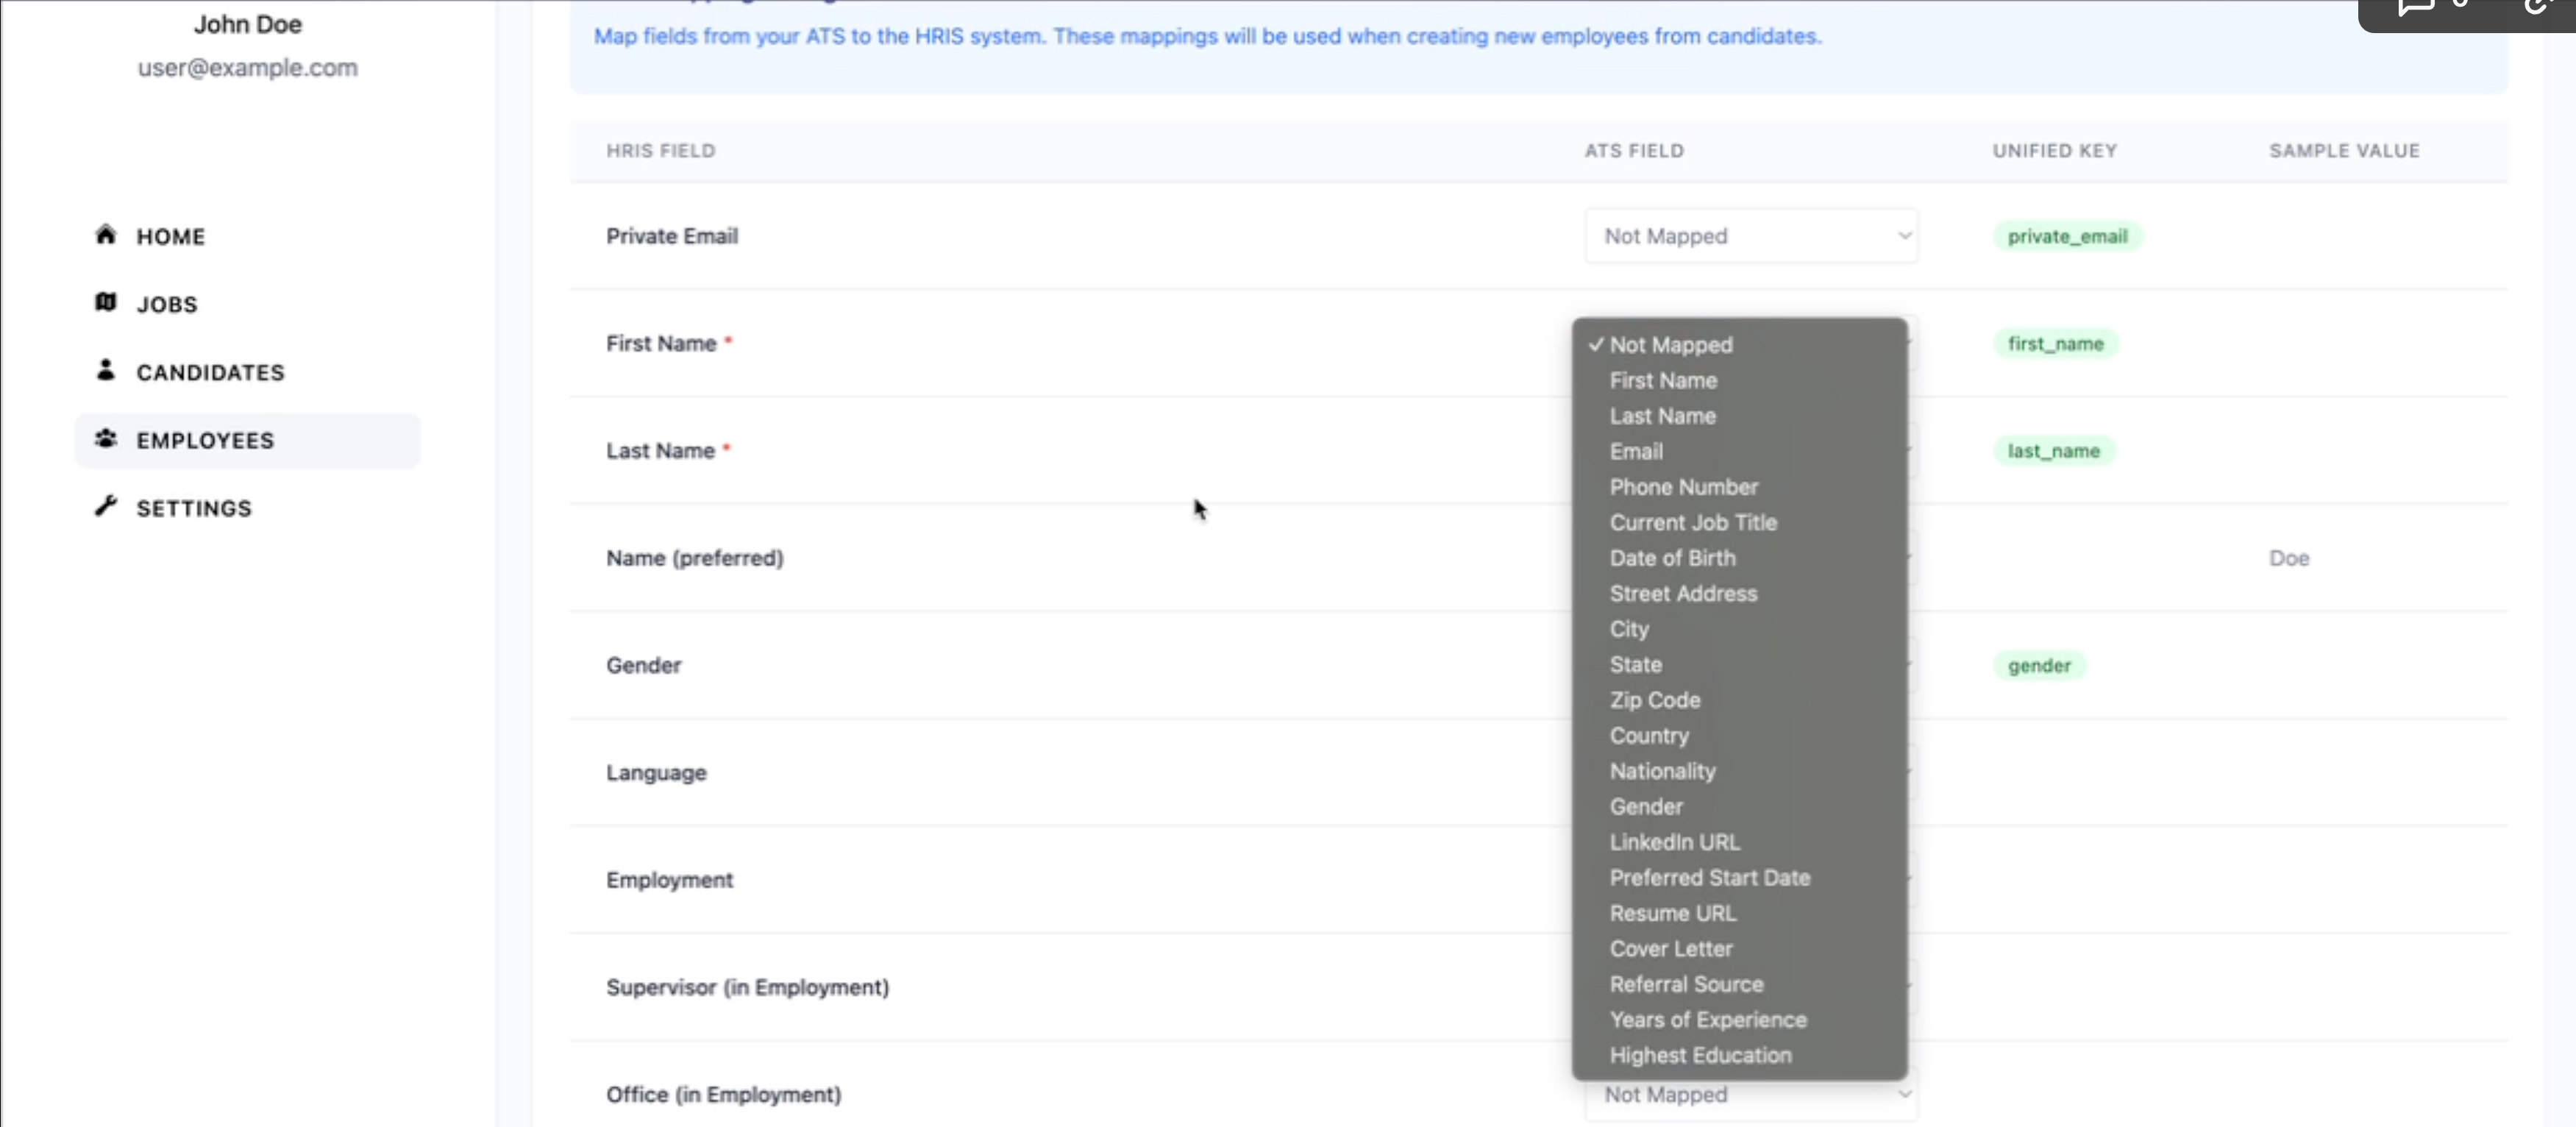
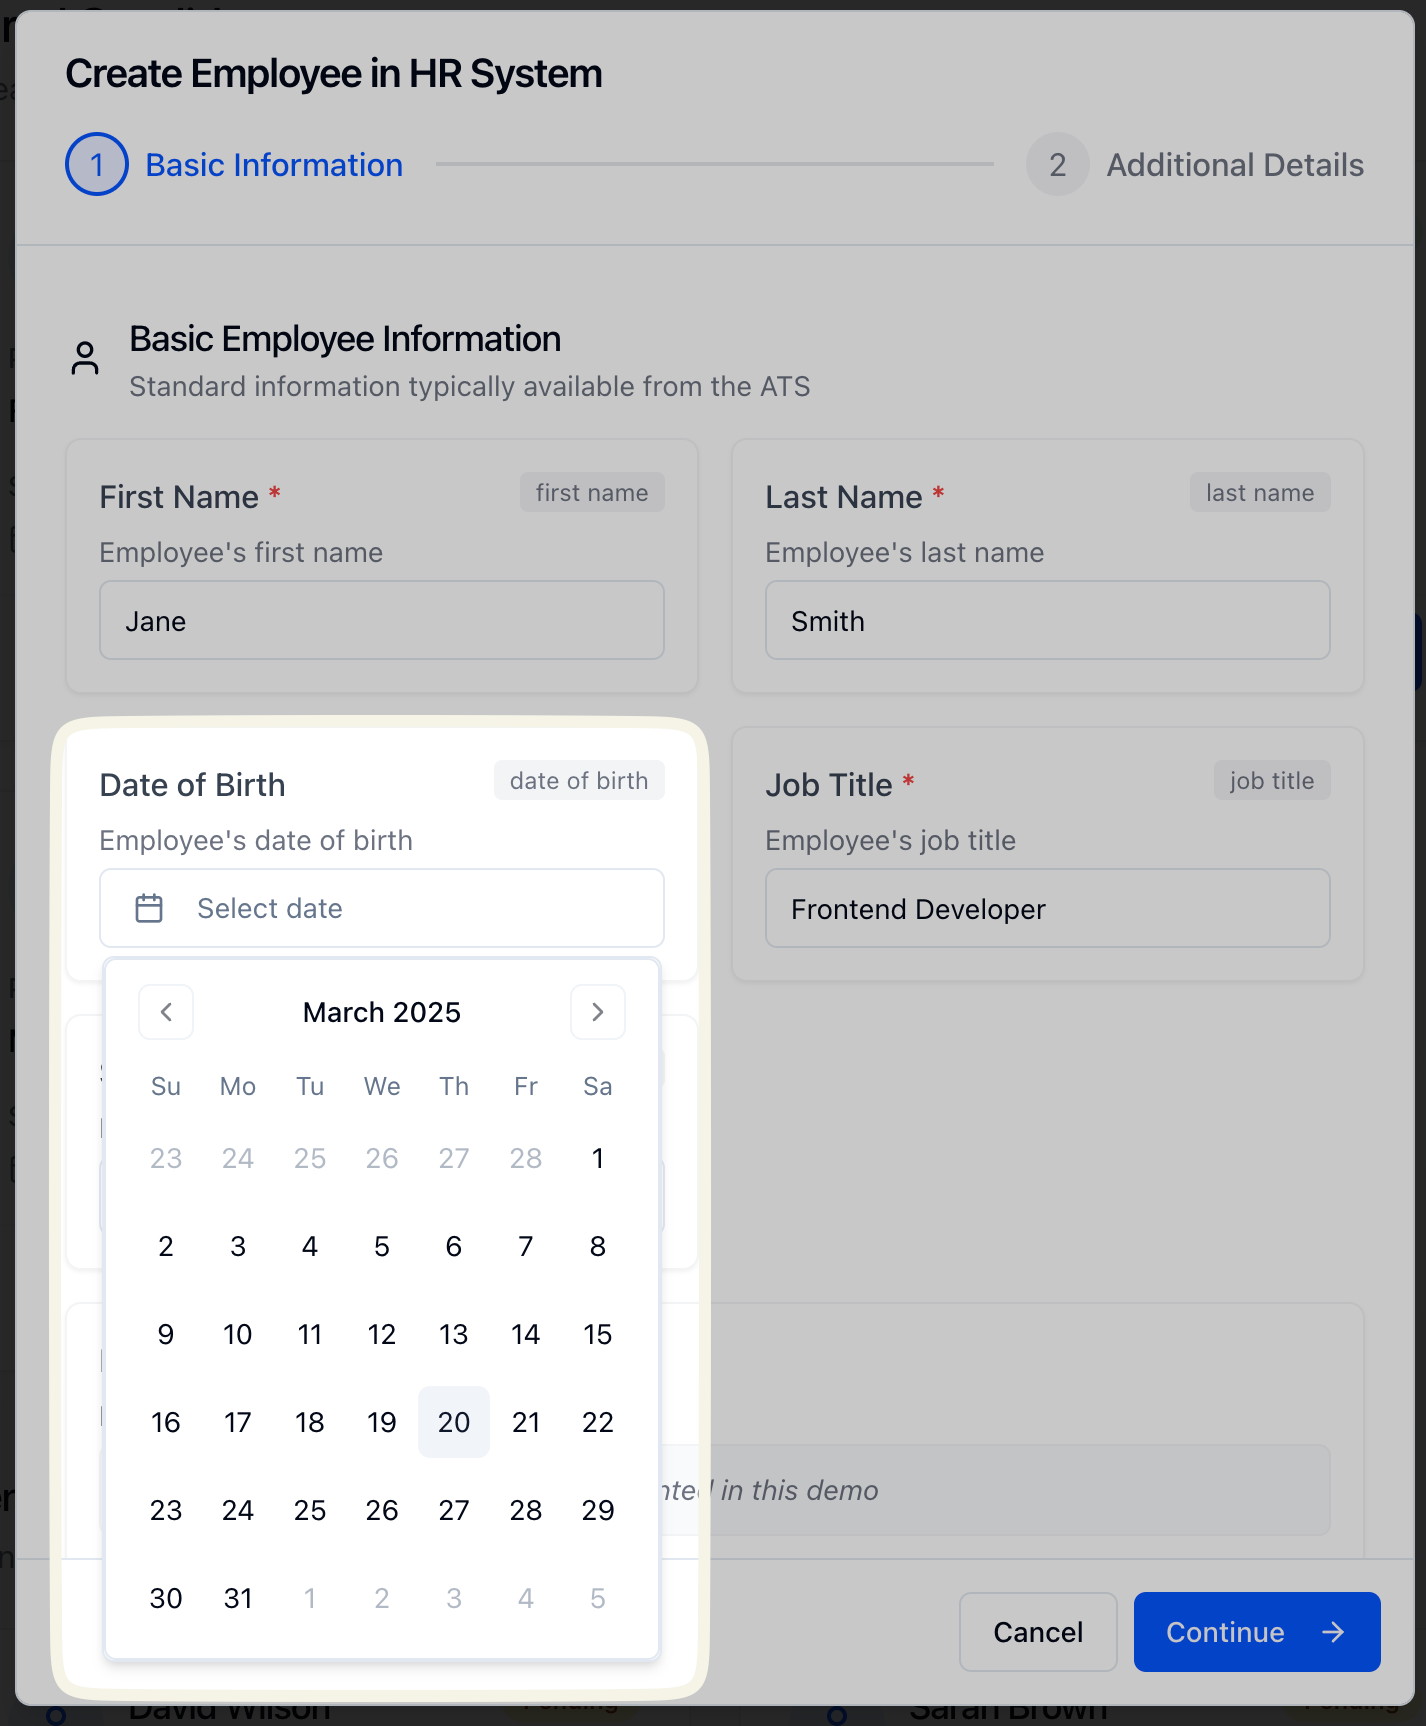
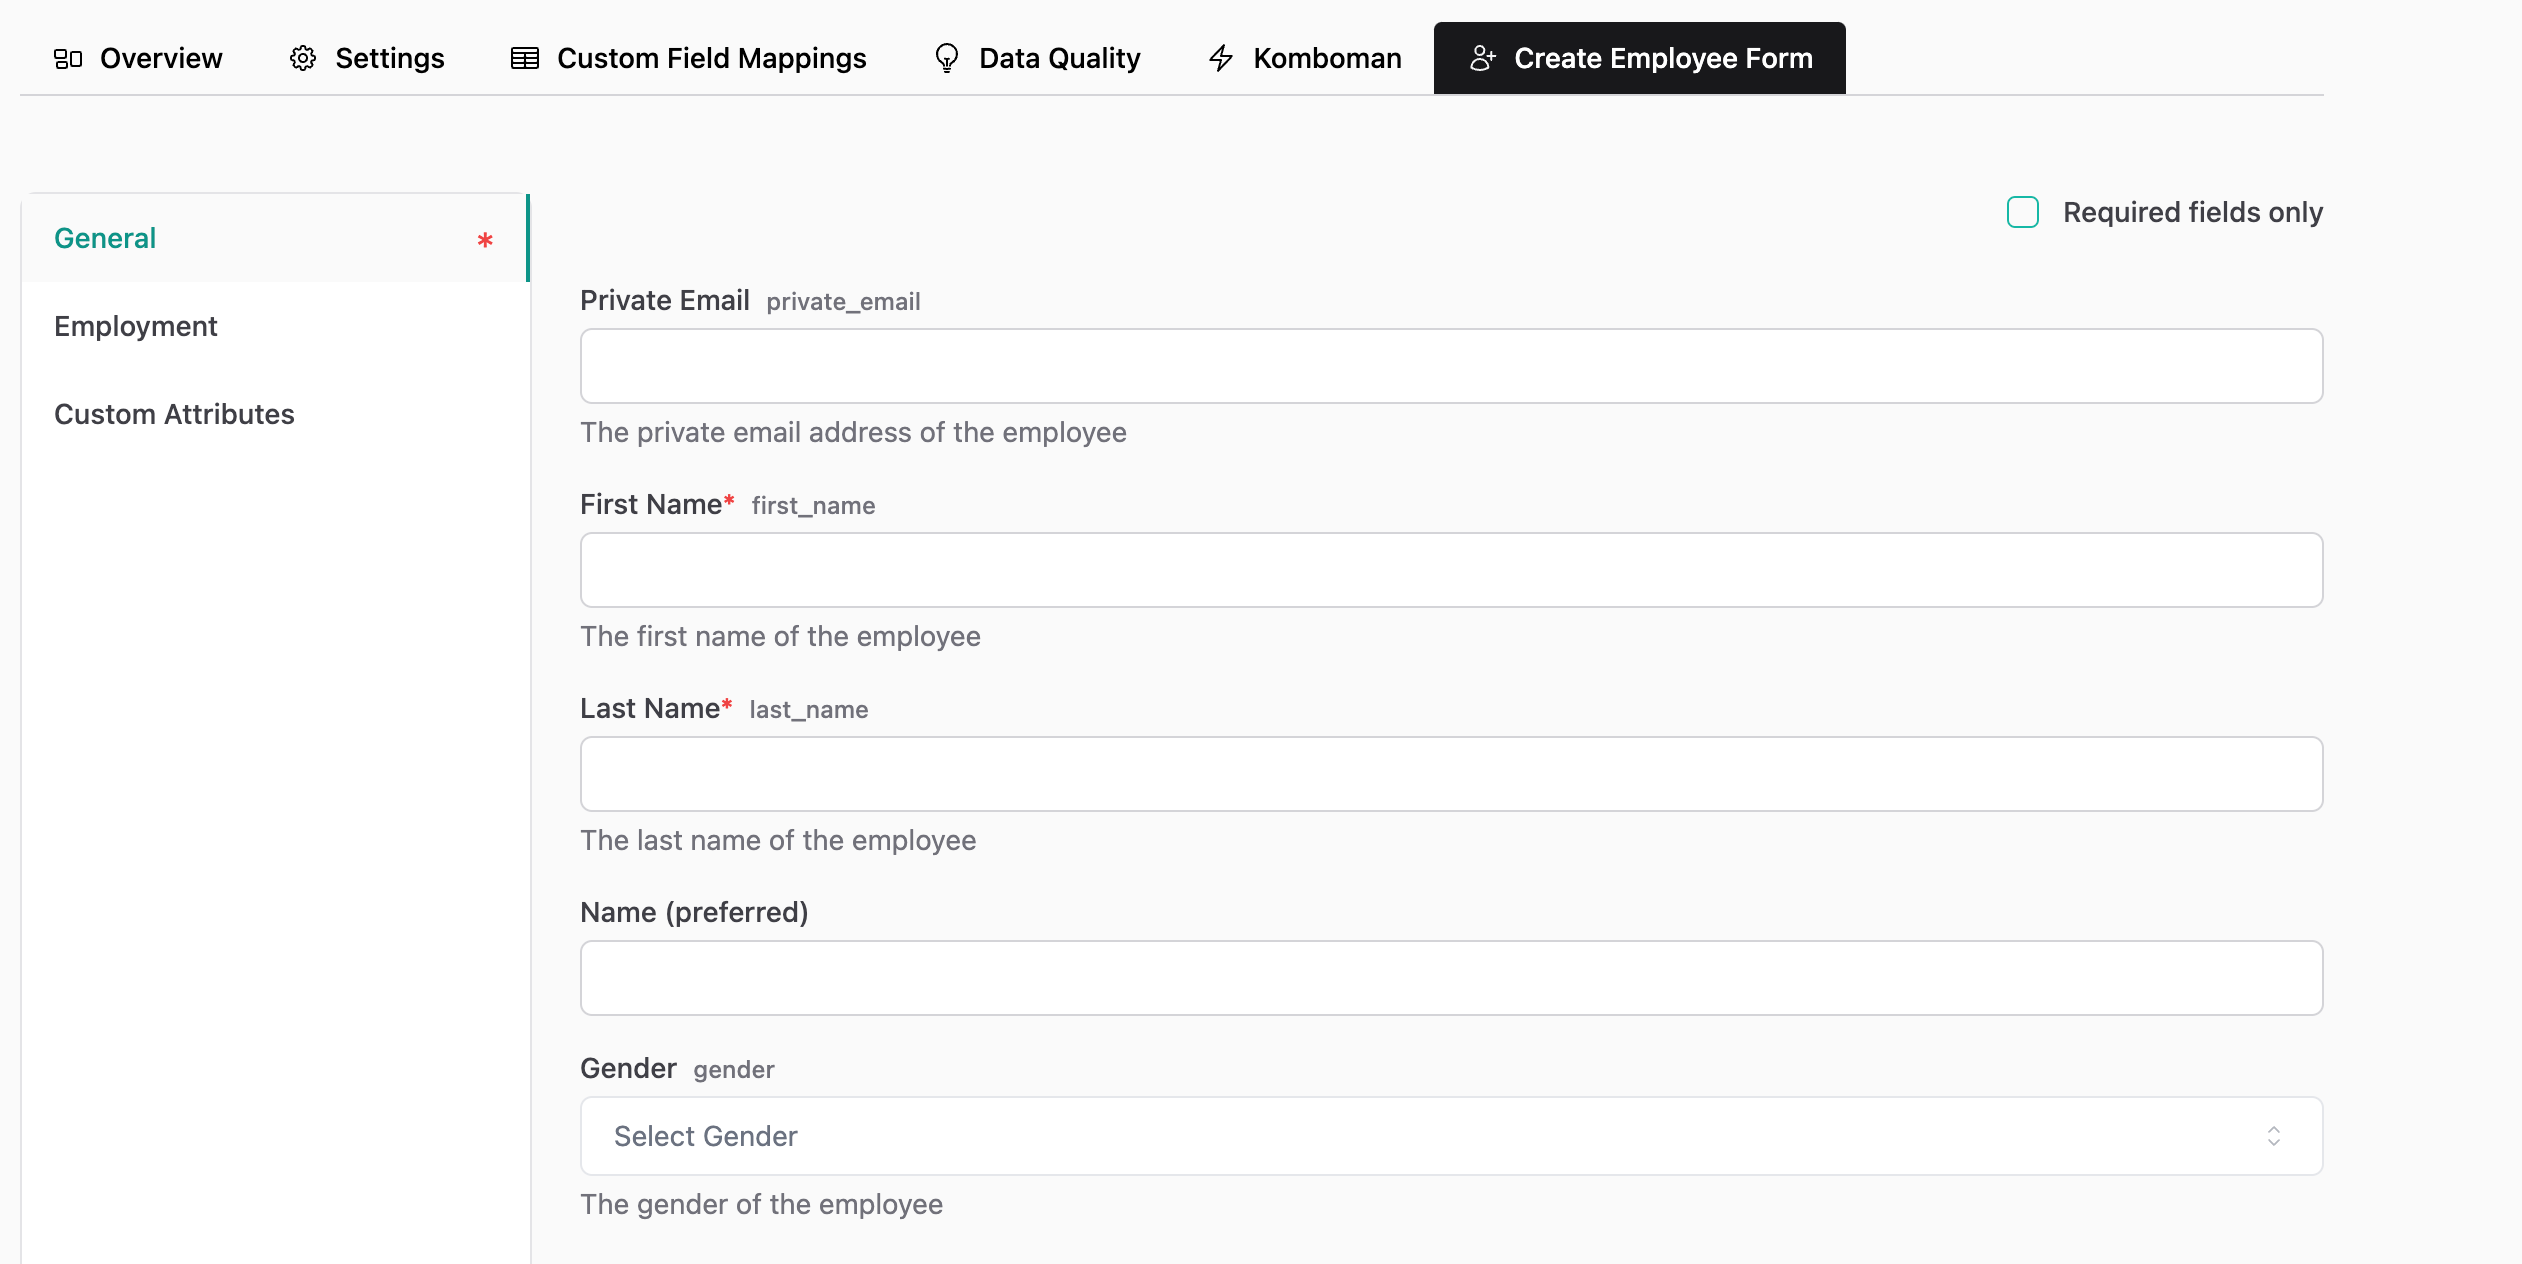
        You'll receive a JSON schema describing required fields, data types, labels, validation rules, and unified keys. Below is more information on how this schema is built.

        **Note:**

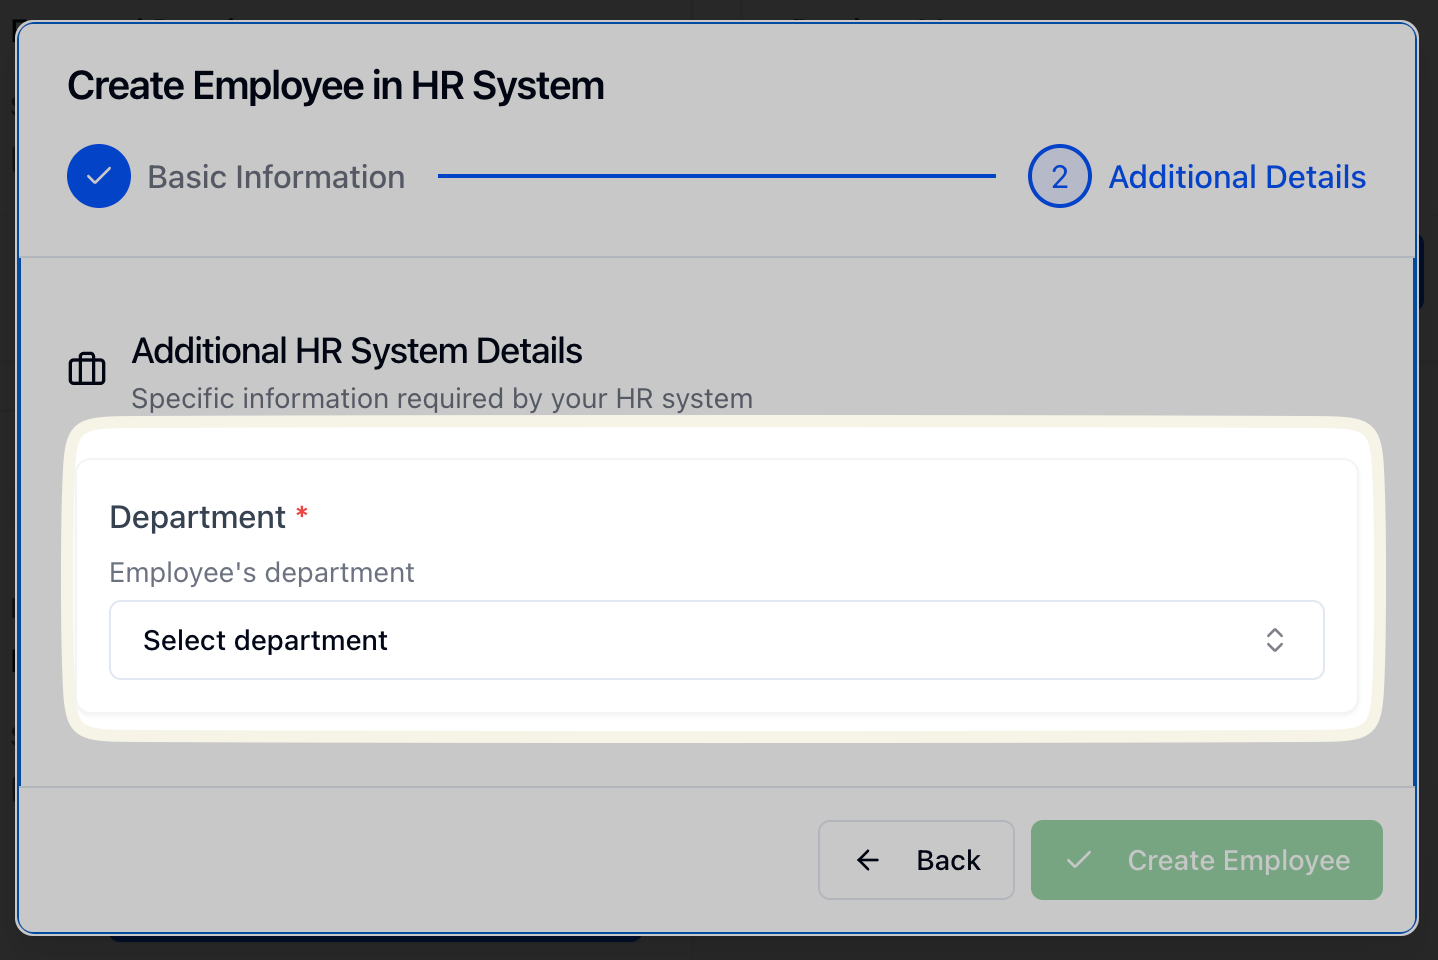
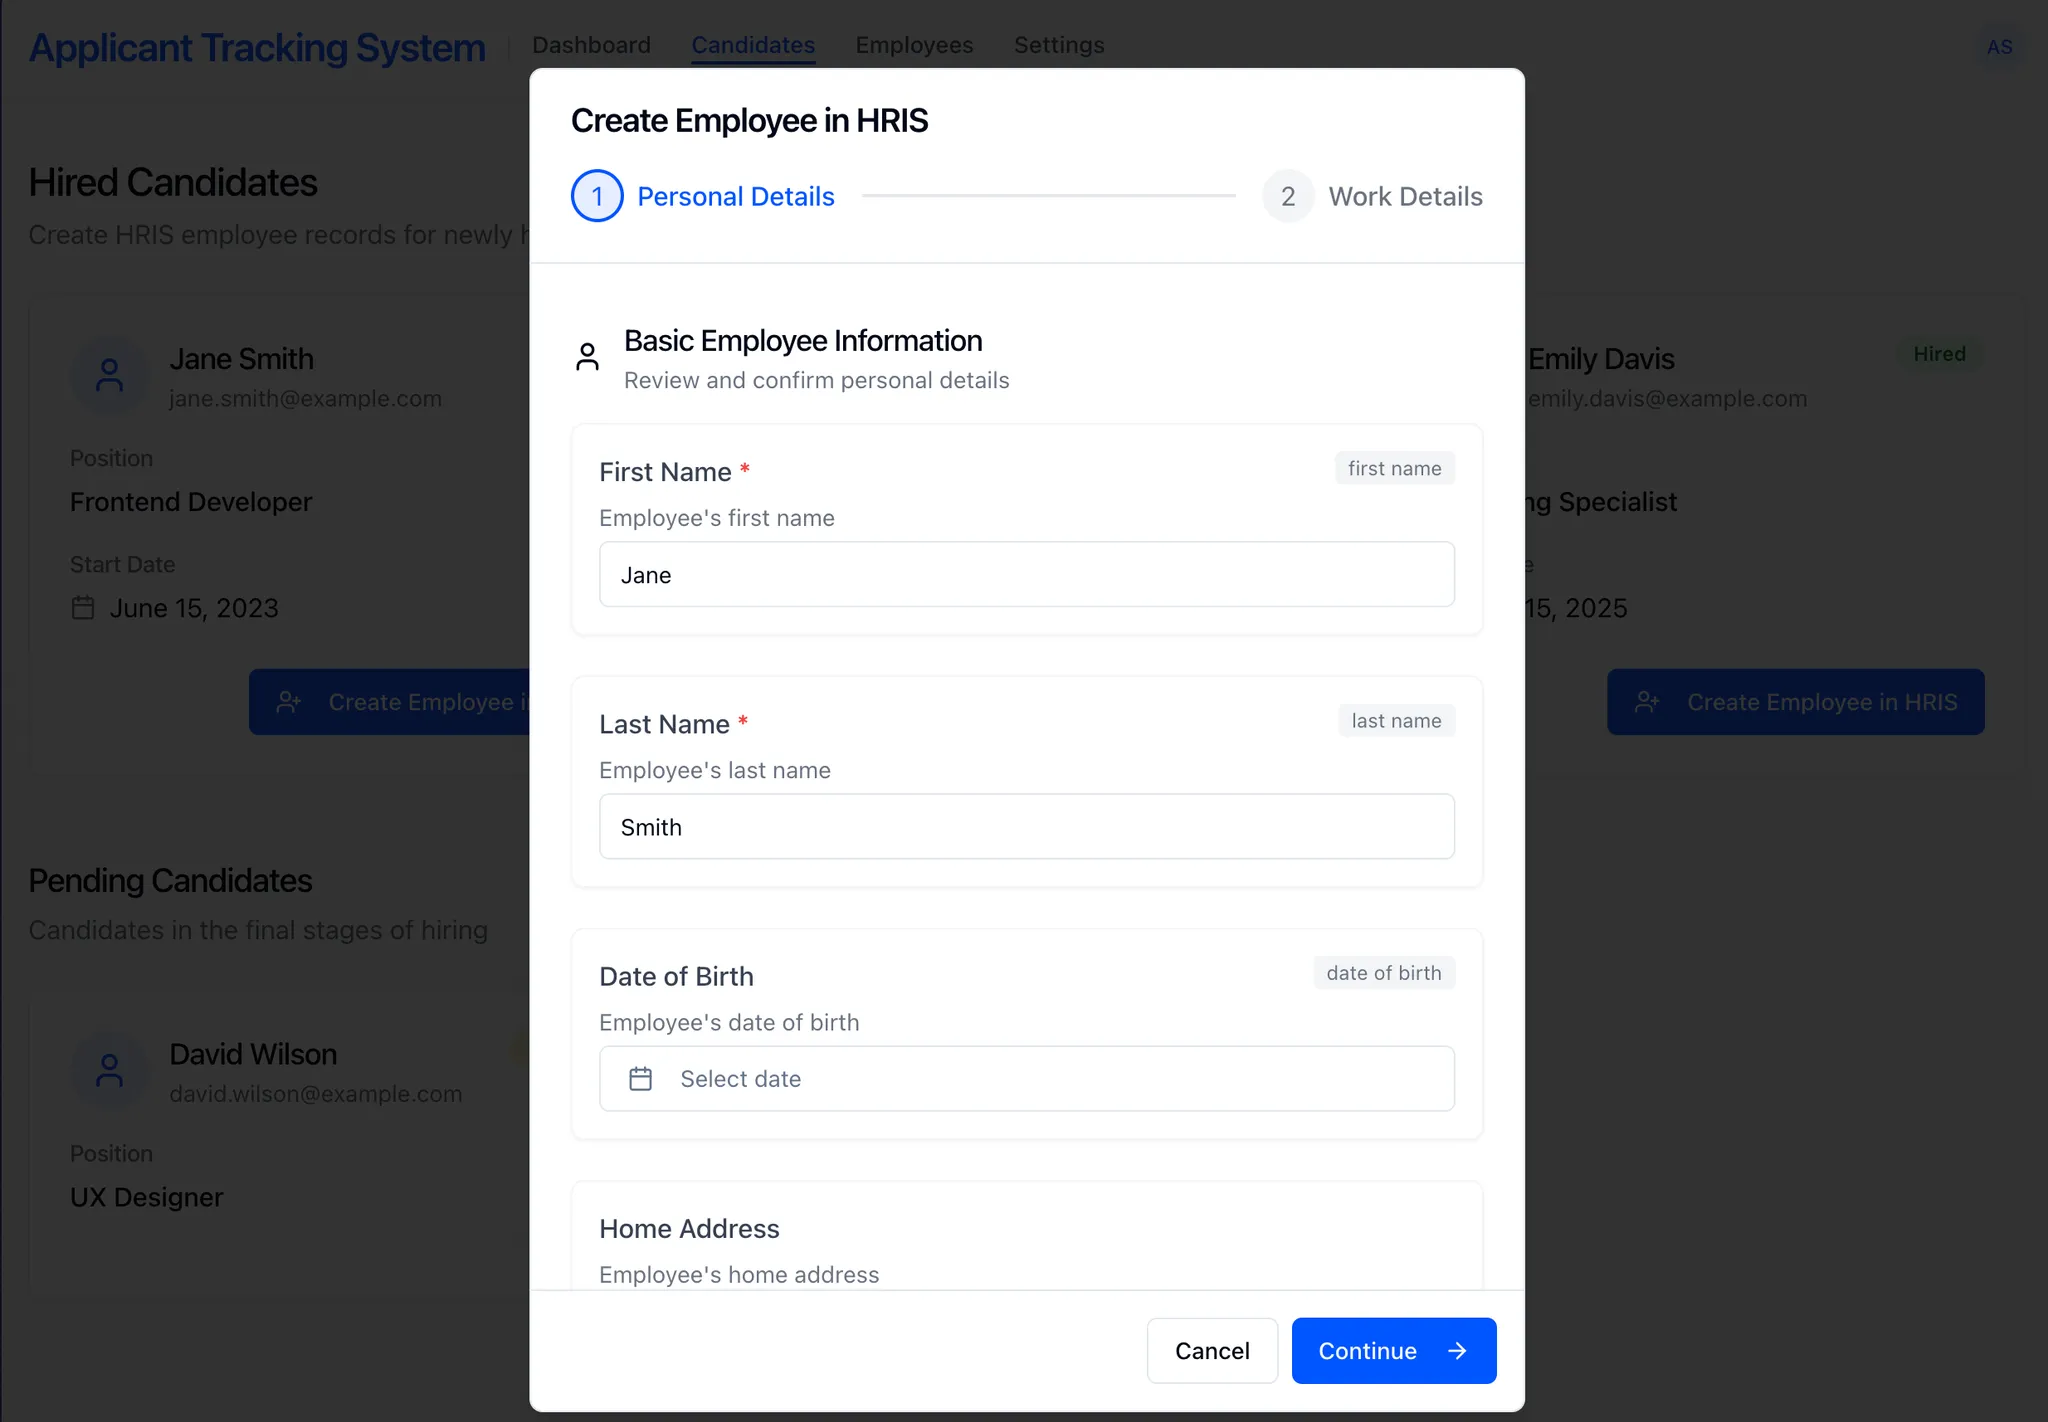
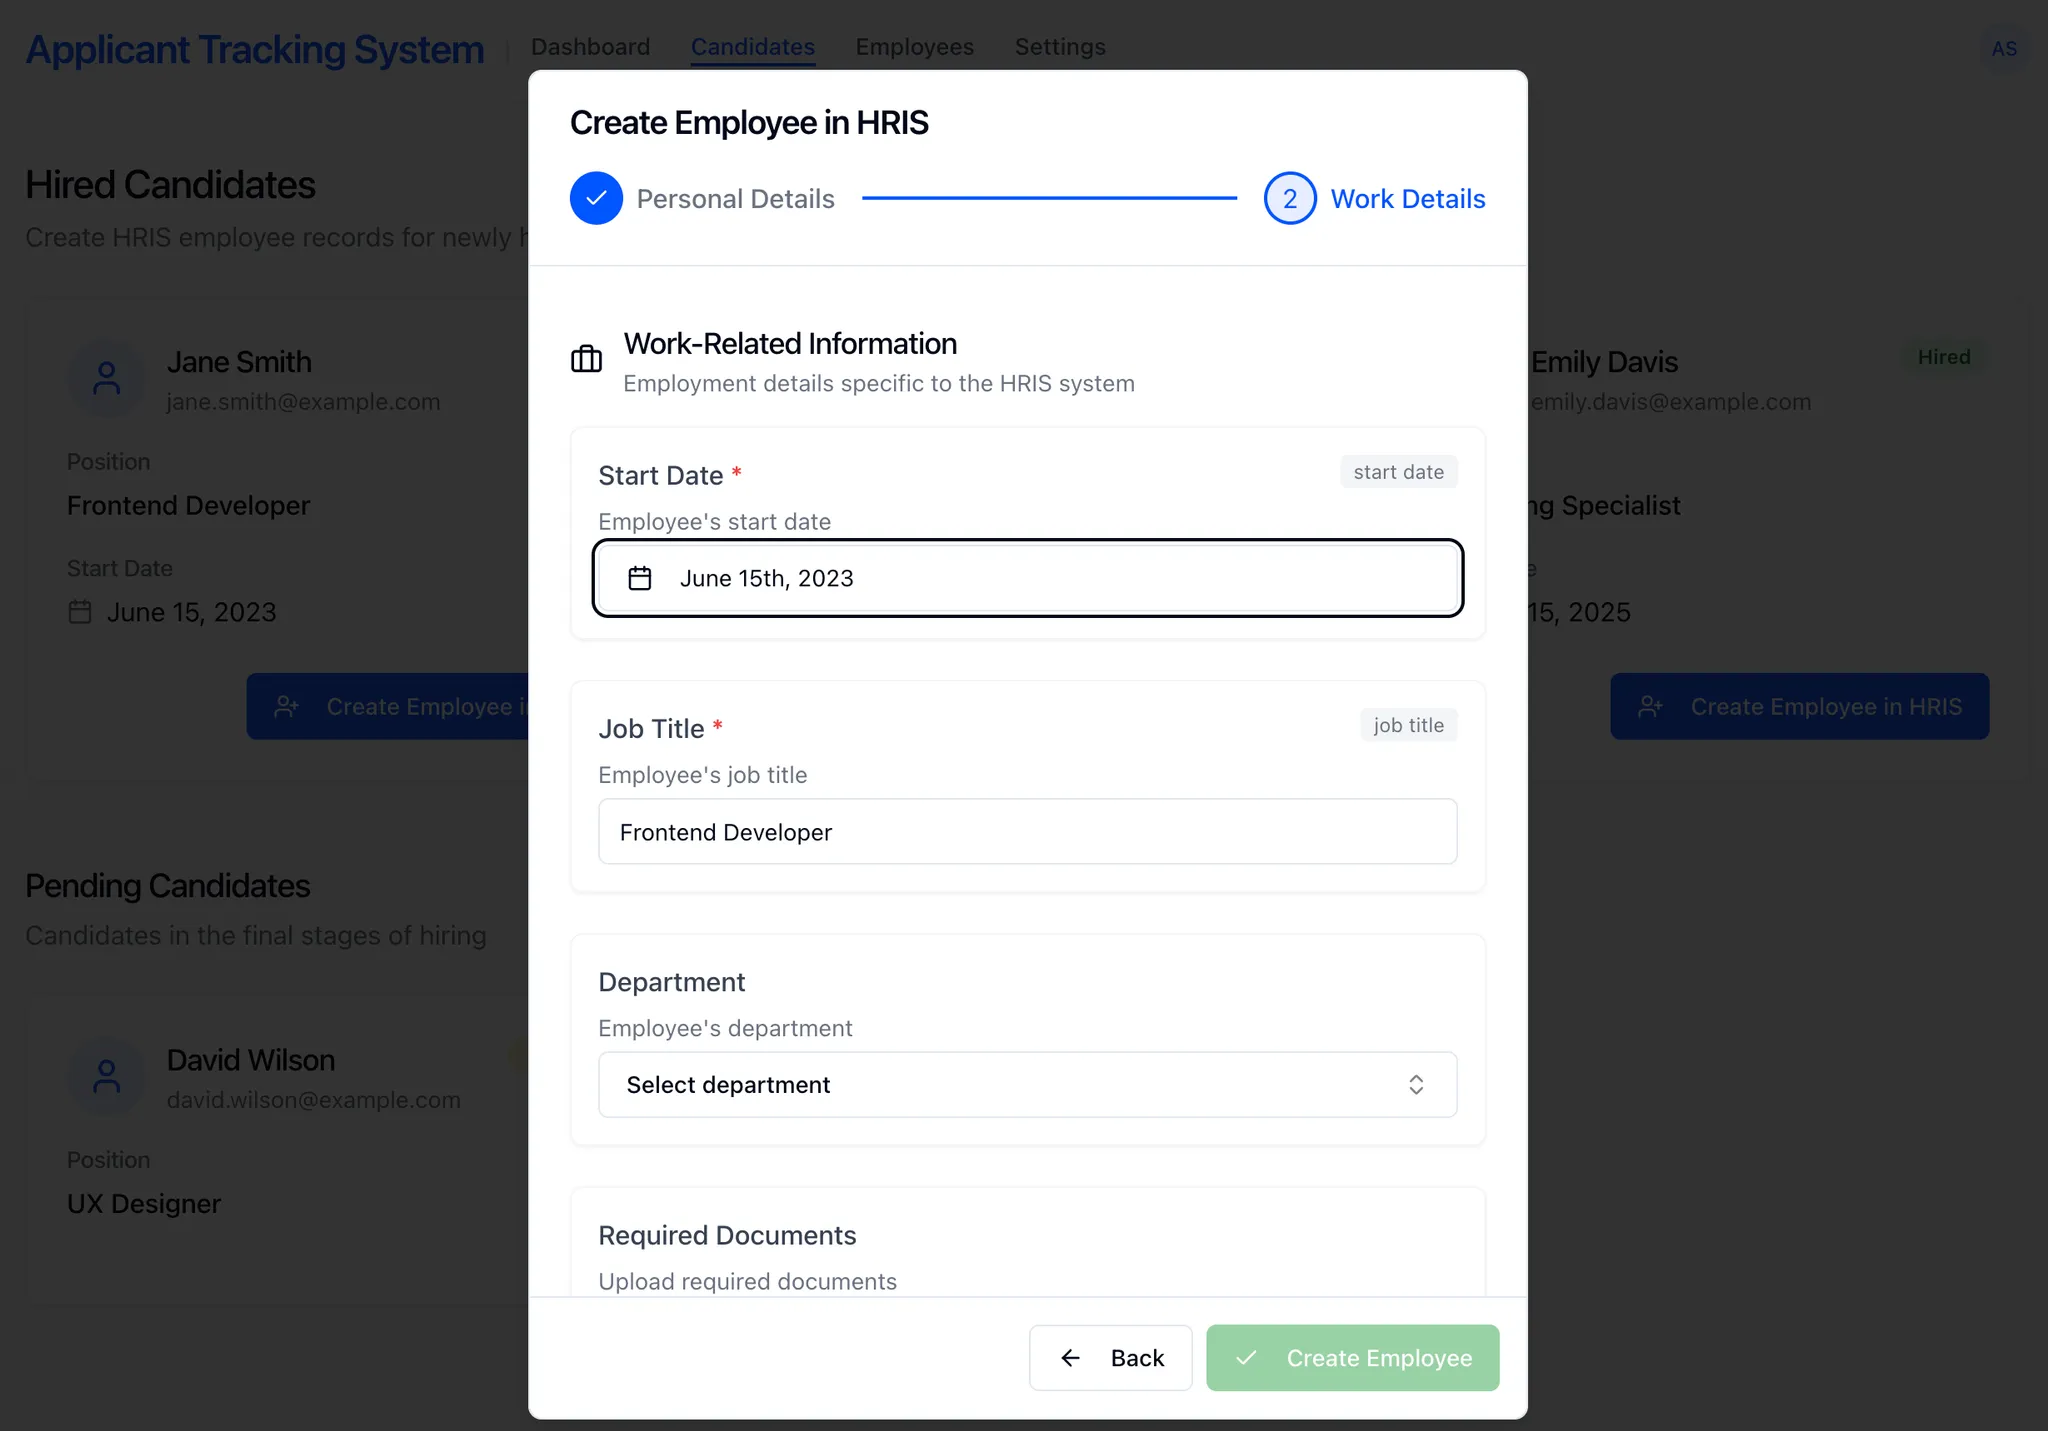
        The schema fields you receive are different for every HRIS and often even by instance.  (e.g. `firstName`, `startDate`, `workLocation` in the example response)

        <Tip>
          **Hiring into a position or requisition?** Pass an optional
          `staffing_entity_id` query parameter to scope the form — whenever possible
          form fields will be pre-filtered to the values linked to the selected staffing entity.
          This includes Kombo unisversal fields like `department` or `location`, but also deeply
          tool specific fields like `payGroup` from UKG Pro.
          See the [staffing entities in create employee guide](/hris/implementation-guide/staffing-entities-in-create-employee)
          for the full workflow.
        </Tip>
      </div>

      <div>
        **Example Response Snippet:**

        ```tsx Example Response [expandable] theme={null}
        {
          "status": "success",
          "data": {
            "properties": {
              "firstName": {
                "label": "First Name",
                "required": true,
                "description": "Employee's first name",
                "unified_key": "first_name",
                "type": "text",
                "min_length": 1,
                "max_length": 100
              },
              "startDate": {
                "label": "Start Date",
                "required": true,
                "description": "Employee's start date",
                "unified_key": "start_date",
                "type": "date"
              },
              "workLocation": {
                "label": "Work Location",
                "required": false,
                "description": "Employee's work location",
                "unified_key": null,
                "type": "object",
                "properties": {
                  "site": {
                    "label": "Site",
                    "required": true,
                    "description": "Employee's site",
                    "unified_key": null,
                    "type": "single_select",
                    "options": {
                      "type": "inline",
                      "entries": [
                        {
                          "id": "FXrER44xubBqA9DLgZ3PFNNx",
                          "label": "Office",
                          "remote_id": "office_001"
                        },
                        {
                          "id": "2rv75UKT2XBoQXsUb9agiTUm",
                          "label": "Warehouse",
                          "remote_id": "warehouse_001"
                        }
                      ]
                    }
                  },
                  "keyNumbers": {
                    "label": "Key Numbers",
                    "required": false,
                    "description": "Employee's key numbers",
                    "unified_key": null,
                    "type": "array",
                    "item_type": {
                      "label": "Key Number",
                      "required": false,
                      "description": "The number of the keys which belong to the employee",
                      "unified_key": null,
                      "type": "number",
                      "min": 0,
                      "max": 99
                    },
                    "min_items": 2,
                    "max_items": 5
                  }
                }
              }
            }
          }
        }
        ```
      </div>
    </div>
  </Step>

  <Step title="Auto-fill Standard Fields via Unified Keys">
    <div className="grid grid-cols-1 gap-4">
      <div>
        To create an employee record, all fields required by the HRIS must be populated appropriately and submitted. Most HRIS will require some similar standard fields such as `first_name` and `last_name` – which can automatically be pre-populated if the data already exists within your ATS; for that, the `unified_key` property can be used, which is included on standard fields within the schema retrieved in the previous step.
      </div>

      <div>
        **Example:**

        * If an HRIS wants a property with the following key:

          ```
          { "FirstNameOfEmployee": "Jane" }
          ```

        * Kombo automatically maps this property to the `unified_key`:

          ```jsx theme={null}
          "FirstNameOfEmployee":{
             "label":"First Name",
             "required":true,
             "description":"The first name of the employee",
             "unified_key":"first_name",
             "type":"text",
             "min_length":null,
             "max_length":null
          }
          ```
      </div>
    </div>

    **Supported Unified Keys include:**

    ```tsx Unified Keys [expandable] theme={null}
      'first_name',
      'last_name',
      'date_of_birth',
      'gender',
      'home_address.city',
      'home_address.country',
      'home_address.state',
      'home_address.street_1',
      'home_address.street_2',
      'home_address.zip_code',
      'job_title',
      'legal_entity_id',
      'location_id',
      'mobile_phone_number',
      'home_phone_number',
      'nationality',
      'start_date',
      'work_email',
      'private_email',
      'yearly_salary',
    ```

    **Unified Values for Gender Mapping:**

    ```tsx Unified Values theme={null}
      'MALE',
      'FEMALE',
      'NON_BINARY',
      'NOT_SPECIFIED',
    ```

    **After fetching the schema:**

    * Automatically populate fields with unified keys (e.g. `first_name` or `start_date`) if the data is already available in your ATS.
  </Step>

  <Step title="Add Field Mapping (highly recommended, but optional)">
    <div className="grid grid-cols-1 gap-4">
      <div>
        To create an employee record, all fields required by the HRIS must be populated appropriately and submitted. Most HRIS will require some similar basic fields such as `first_name` and `last_name` – which can automatically be pre-populated if the data already exists within your ATS; for that, we use the `unified_key`.

        However, an individual employer might also have less common or custom fields that are required to create an employee record in their specific HRIS instance. For example, a travel-related company might have a field for `nationality` configured in their HRIS, which they require to create an employee record (this field would be included in the form schema retrieved in the previous step).
      </div>

      <div>
        ```json Required Field Example theme={null}
        "nationality": {
                        "label": "Nationality",
                        "required": true,
                        "description": "Nationality of the employee.",
                        "unified_key": null,
                        "type": "text",
                        "min_length": null,
                        "max_length": null
                    },
        ```
      </div>
    </div>

    In this example, if you already have data for a person's nationality stored within your ATS (e.g. because it was captured as part of a job application), then the ATS field with the nationality value can be mapped to the `nationality` field returned in the HRIS form schema.

    We recommend providing your users the option to manually map ATS fields to HRIS fields via an intuitive UI.

    <Accordion title="Guidance for UI Implementation">
      * **Automatically populate fields** such as `first_name` or `start_date` if already available in your ATS.
      * **Field Mapping UI:** For HRIS admins, provide an intermediate mapping step after the HRIS connection, that verifies and adjusts the correspondence between ATS data fields and the HRIS schema.
      * **Responsive Design:** Ensure the form displays correctly on both desktop and mobile devices.

      <Frame caption="Example: Field Mapping UI">
        <img src="https://mintcdn.com/kombo/wgjPsGjJZE2PEhQP/images/create-employee-mapping-example.png?fit=max&auto=format&n=wgjPsGjJZE2PEhQP&q=85&s=e71f12b1a26c4ad99a4e0565e20f8196" alt="image.png" width="3502" height="1532" data-path="images/create-employee-mapping-example.png" />
      </Frame>
    </Accordion>
  </Step>

  <Step title="Capturing Any Missing Data (highly recommended, but optional)">
    There might be situations in which an employer's HRIS might require specific fields to be populated, where you either:

    1. Do not have the specific data available within your ATS
    2. Require user input to decide on the correct value

    <Tabs>
      <Tab title="Example 1: Data Unavailable in ATS">
        <div className="grid grid-cols-1 gap-4">
          <div>
            For example, an employer might have a field for `dateOfBirth` configured in their HRIS, which they require to create an employee record (these fields would be included in the form schema retrieved in step 1).

            In the example of the `dateOfBirth` field, you might not have data stored within the ATS that you can map into this field. Therefore, you'd want to expose an input field to the user while creating the employee record, prompting the user to enter this missing information, required by the HRIS.
          </div>

          <div>
            ```json Example Field theme={null}
            "dateOfBirth": {
                            "label": "Date of Birth",
                            "required": true,
                            "description": "Date of birth of the employee.",
                            "unified_key": "date_of_birth",
                            "type": "date"
                        }
            ```

            <Frame caption="Example: Data Unavailable in ATS">
              <img src="https://mintcdn.com/kombo/OkxC1UMu0PfEDAZt/images/create-employee-date.png?fit=max&auto=format&n=OkxC1UMu0PfEDAZt&q=85&s=b071da87301fc9e59954c01a0035b8df" alt="image.png" width="1426" height="1726" data-path="images/create-employee-date.png" />
            </Frame>
          </div>
        </div>
      </Tab>

      <Tab title="Example 2: User Input Required">
        <div className="grid grid-cols-1 gap-4">
          <div>
            For example, an employer might have a field for `department` configured in their HRIS, which they require to create an employee record.

            In the example of the department field, you might have the relevant department options stored within your ATS. But it might be necessary for the ATS user (e.g. an HR manager) to decide which specific department should apply to this employee. In this case, you could display an input field to the user, with dropdown options to choose the correct department.

            For `single_select` and `multi_select` fields, the options can be set as `referenced` rather than provided `inline`. This means that the selectable options won't be included directly in the form; instead, you'll need to query them separately from Kombo or your database.

            This method is commonly used for scenarios such as selecting supervisors (employees) or referencing departments. To support this, we provide you with a query link from the Kombo model, which you can use to retrieve and display relevant information—such as the department name—and return the corresponding ID as the selected value or values.
          </div>

          <div>
            ```json Example Field theme={null}
            "department": {
                            "label": "Department",
                            "required": true,
                            "description": "Department of the employee.",
                            "unified_key": null,
                            "type": "single_select",
                            "options": {
                                "type": "referenced",
                                "link": "https://api.kombo.dev/v1/hris/groups?types=DEPARTMENT"
                            }
                        }
            ```

            <Frame caption="Example: User Input Required">
              <img src="https://mintcdn.com/kombo/OkxC1UMu0PfEDAZt/images/create-employee-department.png?fit=max&auto=format&n=OkxC1UMu0PfEDAZt&q=85&s=b514ec2b6864b58fe96bdaf400b81992" alt="image.png" width="1438" height="960" data-path="images/create-employee-department.png" />
            </Frame>
          </div>
        </div>
      </Tab>
    </Tabs>

    <Accordion title="Guidance for UI Implementation">
      * **Dynamically generate fields to display:** Parse the schema to render appropriate inputs (e.g., text boxes, date pickers, dropdowns, checkboxes).
      * **Auto-populate fields when possible:** Pre-populate fields such as `first_name` or `start_date` if already available in your ATS. You can also consider not displaying pre-populated fields at all, for a simplified UI/UX.

      **More UX/UI Examples:**

      <Frame caption="Example: Missing Data Capture">
        <img src="https://mintcdn.com/kombo/wgjPsGjJZE2PEhQP/images/create-employee-form.png?fit=max&auto=format&n=wgjPsGjJZE2PEhQP&q=85&s=d589ead50a7d4e687f9363e1939eb6ff" alt="image.png" width="2048" height="1422" data-path="images/create-employee-form.png" />
      </Frame>

      <Frame caption="Example: Missing Data Capture">
        <img src="https://mintcdn.com/kombo/wgjPsGjJZE2PEhQP/images/create-employee-form-2.png?fit=max&auto=format&n=wgjPsGjJZE2PEhQP&q=85&s=e6d17e7c1af57403f0be9da2d29b1843" alt="image.png" width="2048" height="1431" data-path="images/create-employee-form-2.png" />
      </Frame>
    </Accordion>
  </Step>

  <Step title="Submitting Employee Data">
    <div className="grid grid-cols-1 gap-4">
      <div>
        **Endpoint:**

        `POST` [https://api.kombo.dev/v1/hris/employees/form](https://api.kombo.dev/v1/hris/employees/form)

        **Request:**

        Submit data matching the retrieved schema format to create an employee record.

        **How it works:**

        * **All required fields** from the schema retrieved in the GET call **must be included**
        * The POST payload mirrors the GET schema's nested structure.
        * Data is organized under the properties key.
        * For nested fields (like `workLocation` in the example request snippet), include the corresponding sub-objects or arrays.
      </div>

      <div>
        **Example Request Snippet:**

        ```json Example Result theme={null}
        {
           "properties":{
              "firstName":"UserFirst",
              "startDate":"2025-01-15",
              "workLocation":{
                 "site":"ad67886e26d",
                 "keyNumbers":[
                    2,
                    44,
                    5
                 ]
              }
           }
        }
        ```
      </div>
    </div>
  </Step>

  <Step title="Understanding the Response">
    After submitting employee data, you'll receive a response containing three fields:

    <div className="grid grid-cols-1 gap-4">
      <div>
        ```json Example Response theme={null}
        {
          "status": "success",
          "data": {
            "id": "26vafvWSRmbhNcxJYqjCzuJg",
            "remote_id": "12345",
            "prehire": {
              "remote_id": null
            }
          },
          "warnings": []
        }
        ```

        * **`id`** – The Kombo ID of the created employee record. This will be `null` if only a pre-hire was created.
        * **`remote_id`** – The raw ID from the remote HRIS system. This is only populated when `id` is set (i.e., when a full employee was created). For pre-hires, use the `prehire` object instead.
        * **`prehire`** – An object containing the temporary prehire information from the remote system. Includes a `remote_id` field with the prehire ID (or `null` if there is no pre-hire). This ID may change or become invalid when the prehire becomes a full employee. The `remote_id` is only populated when `id` is `null`.
      </div>
    </div>

    ### When is an Employee Upserted?

    The behavior of employee creation depends on the connected HRIS system and how it handles new employee records:

    <Tabs>
      <Tab title="Immediate Employee Creation">
        **Scenario:** The employee record is created immediately in the HRIS and synced to Kombo.

        In this case:

        * ✅ **`id`** contains the Kombo employee ID
        * ✅ **`remote_id`** contains the HRIS system's ID
        * ✅ **`prehire.remote_id`** is `null`
        * ✅ The employee appears immediately in subsequent sync results

        ```json Response Example theme={null}
        {
          "status": "success",
          "data": {
            "id": "26vafvWSRmbhNcxJYqjCzuJg",
            "remote_id": "emp_12345",
            "prehire": {
              "remote_id": null
            }
          }
        }
        ```

        **Use Case:** Most HRIS systems that create employees directly (e.g., Personio).
      </Tab>

      <Tab title="Pre-hire Creation">
        **Scenario:** The HRIS creates a "pre-hire" or "pending employee" that becomes a full employee after completing onboarding steps.

        In this case:

        * ⚠️ **`id`** is `null` (employee not yet in Kombo's database)
        * **`remote_id`** is `null` (no persistent employee ID yet)
        * **`prehire.remote_id`** may contain the temporary prehire/pending employee ID from the HRIS, or be `null` if the system doesn't return an identifier
        * ⏳ The employee will appear in Kombo after the next sync, once onboarding is complete in the HRIS

        ```json Response Example (with prehire) theme={null}
        {
          "status": "success",
          "data": {
            "id": null,
            "remote_id": null,
            "prehire": {
              "remote_id": "prehire_67890"
            }
          }
        }
        ```

        ```json Response Example (without prehire) theme={null}
        {
          "status": "success",
          "data": {
            "id": null,
            "remote_id": null,
            "prehire": {
              "remote_id": null
            }
          }
        }
        ```

        **Use Case:** HRIS systems with multi-step onboarding workflows. Some return a pre-hire identifier (e.g., Paylocity, Workday), while others don't return any identifier (e.g., HiBob's [Hire API](https://apidocs.hibob.com/docs/how-to-integrate-with-ats-hire-api)).
      </Tab>
    </Tabs>
  </Step>
</Steps>

## Field Types & Validation

Our API supports several field types, each with its own validation rules. Below are summarized examples:

<AccordionGroup>
  <Accordion title="Text">
    <div className="grid grid-cols-1 gap-4">
      <div>
        Used for any textual input (e.g., first names, last names). Supports length constraints via `min_length`/`max_length` and pattern validation via `reg_exp` (regular expression).
      </div>

      <Warning>
        When a field includes both length constraints and regex patterns (as defined by the API), **all validations must pass**. Ensure your input data meets both the length requirements and matches the specified regex pattern.
      </Warning>

      <div>
        **Schema**

        ```jsx Schema theme={null}
        {
          type: "text";
          label: string;
          required: boolean;
          description: string | null;
          unified_key: string | null;
          min_length: number | null;
          max_length: number | null;
          reg_exp: string | null;
        }
        ```

        **Post Example**

        ```json Post Example theme={null}
        {
          "position": "Data Engineering"
        }
        ```

        **Validation Examples**

        ```json Examples theme={null}
        // ✅ Email validation with length constraints
        {
          "min_length": 3,
          "max_length": 100,
          "reg_exp": "^[^@]+@[^@]+$"
        }
        ```
      </div>
    </div>
  </Accordion>

  <Accordion title="Number">
    <div className="grid grid-cols-1 gap-4">
      <div>
        Used for numeric values such as ages or IDs.
      </div>

      <div>
        **Schema**

        ```jsx Schema theme={null}
        {
          type: "number";
          label: string;
          required: boolean;
          description: string | null;
          unified_key: string | null;
          min: number | null;
          max: number | null;
        }
        ```

        **Post Example**

        ```json Post Example theme={null}
        {
          "keyCard": 4
        }
        ```
      </div>
    </div>
  </Accordion>

  <Accordion title="Date">
    <div className="grid grid-cols-1 gap-4">
      <div>
        Used for date entries (e.g., employee start dates). The expected format is `YYYY-MM-DD`.
      </div>

      <div>
        **Schema**

        ```jsx Schema theme={null}
        {
          type: "date";
          label: string;
          required: boolean;
          description: string | null;
          unified_key: string | null;
        }
        ```

        **Post Example**

        ```json Post Example theme={null}
        {
          "hireDate": "2025-01-25"
        }
        ```
      </div>
    </div>
  </Accordion>

  <Accordion title="Single Select">
    <div className="grid grid-cols-1 gap-4">
      <div>
        Allows selection of a single option from a predefined list, if the type is options. Please submit the value of the Item.

        A link is provided for type reference, from which you can query the specific options. For example, this link can be used to get all `employees`, `departments`, or `staffing-entities` (e.g. positions or requisitions). For this case, please submit the ID as the selected value.
      </div>

      <div>
        **Schema**

        ```jsx Schema theme={null}
        {
              type: 'single_select'
              label: string
              required: boolean
              description: string | null
              unified_key: string | null
              options:
                | {
                    type: 'inline'
                    entries: {
                      label: string
                      id: string
                      unified_value: string
                      remote_id: string | number
                    }[]
                  }
                | {
                    type: 'referenced'
                    link: string
                  }
            }
        ```

        **Post Example**

        ```json Post Example theme={null}
        {
          "department": "2rv75UKT2XBoQXsUb9agiTUm"
        }
        ```

        **Remote ID Support**

        Inline single-select fields support submitting remote IDs directly using the `remote:` prefix:

        ```json Remote ID Example theme={null}
        {
          "department": "remote:dept-123"
        }
        ```

        This allows you to use the original remote system IDs instead of Kombo IDs.

        <Note>Only inline single-select fields support this format. Referenced fields require Kombo IDs.</Note>
      </div>
    </div>
  </Accordion>

  <Accordion title="Multi Select">
    <div className="grid grid-cols-1 gap-4">
      <div>
        Allows selection of multiple options from a predefined list. Please submit the values of the items.

        A link is provided for type reference, from which you can query the specific options. For example, this link can be used to get all `employees`, `departments`, or `staffing-entities` (e.g. positions or requisitions). For this case, please submit the IDs as the selected values.

        It is possible to have a minimum and maximum amount of items.
      </div>

      <div>
        **Schema**

        ```jsx Schema theme={null}
        {
              type: 'multi_select'
              label: string
              required: boolean
              description: string | null
              unified_key: string | null
              options:
                | {
                    type: 'inline'
                    entries: {
                      label: string
                      id: string
                      unified_value: string
                      remote_id: string | number
                    }[]
                  }
                | {
                    type: 'referenced'
                    link: string
                  }
            }
        ```

        **Post Example**

        ```json Post Example theme={null}
        {
          "supervisors": ["2rv75UKT2XBoQXsUb9agiTUm","FXrER44xubBqA9DLgZ3PFNNx"]
        }
        ```

        **Remote ID Support**

        Inline multi-select fields support submitting remote IDs directly using the `remote:` prefix:

        ```json Remote ID Example theme={null}
        {
          "supervisors": ["remote:emp-001", "remote:emp-002"]
        }
        ```

        You can also mix remote IDs with Kombo IDs for inline fields:

        ```json Mixed ID Example theme={null}
        {
          "supervisors": ["remote:emp-001", "2rv75UKT2XBoQXsUb9agiTUm"]
        }
        ```

        This allows you to use the original remote system IDs instead of Kombo IDs.

        <Note>Only inline multi-select fields support this format. Referenced fields require Kombo IDs.</Note>
      </div>
    </div>
  </Accordion>

  <Accordion title="Checkbox">
    <div className="grid grid-cols-1 gap-4">
      <div>
        A simple checkbox used for binary choices
      </div>

      <div>
        **Schema**

        ```jsx Schema theme={null}
        {
          type: "checkbox";
          label: string;
          required: boolean;
          description: string | null;
          unified_key: string | null;
        }
        ```

        **Post Example**

        ```json Post Example theme={null}
        {
          "hasCar": true
        }
        ```
      </div>
    </div>
  </Accordion>

  <Accordion title="Object">
    <div className="grid grid-cols-1 gap-4">
      <div>
        Used for nested fields or grouped data. Each property within the object is defined using a field type.
      </div>

      <div>
        **Schema**

        ```jsx Schema theme={null}
        {
          type: "object";
          label: string;
          required: boolean;
          description: string | null;
          unified_key: string | null;
          properties: {
            [key: string]: FieldObject;
          };
        };
        ```

        **Post Example**

        ```json Post Example theme={null}
        {
           "workLocation":{
              "city":"Berlin",
              ...
           }
        }
        ```
      </div>
    </div>
  </Accordion>

  <Accordion title="Array">
    <div className="grid grid-cols-1 gap-4">
      <div>
        Used when multiple items of the same type are expected, such as a list of values. You can define the minimum and maximum number of items. Please note that the item\_type can also be an object.
      </div>

      <div>
        **Schema**

        ```jsx Schema theme={null}
        {
          type: "array";
          label: string;
          required: boolean;
          description: string | null;
          unified_key: string | null;
          min_items: number | null;
          max_items: number | null;
          item_type: FieldObject;
        };
        ```

        **Post Example**

        ```json Post Example theme={null}
        Object Example:
        {
           "<key>":[
              {
                 "<subKey>":"FieldObjectValue"
              },
              {
                 "<subKey>":"FieldObjectValue"
              }
           ]
        }

        Text Example:
        {
           "tags":[
             "Test1", "Test3", "Test4"
           ]
        }
        ```
      </div>
    </div>
  </Accordion>

  <Accordion title="File">
    <div className="grid grid-cols-1 gap-4">
      <div>
        Used for uploading files. Restrictions, such as accepted MIME types and the maximum allowed file size, can be specified. Please submit the data as a Base64 string.
      </div>

      <div>
        **Schema**

        ```jsx Schema theme={null}
        {
          type: "file";
          label: string;
          required: boolean;
          description: string | null;
          unified_key?: string | null;
          file_restrictions: {
              accepted_mime_types: string[];
              max_file_size?: number | null;
            }
        }
        ```

        **Post Example**

        ```json Post Example theme={null}
        {
          "CV": "UEsDBBQAAAgIAK...."
        }
        ```
      </div>
    </div>
  </Accordion>
</AccordionGroup>

For each type, ensure client-side and server-side validation is in place (e.g., ensuring required fields are provided, input adheres to defined constraints, and clear error messages are surfaced).

## Referenced Models

When a `single_select` or `multi_select` field uses `options.type: "referenced"`, the `link` points to a Kombo HRIS endpoint you can call to retrieve the selectable entries. The selected value(s) you submit back must be the Kombo `id` of the chosen record(s).

The following Kombo data models can appear as reference targets in the employee form. The exact link — including any pre-applied query parameters — is always provided in the form schema, so you should use it as-is rather than constructing it yourself.

<Tip>
  **Recommended: sync referenced data ahead of time instead of fetching it on
  the fly.**

  All of the models below (employees, legal entities, locations, groups, staffing
  entities) are regular Kombo data models that you should already be syncing
  into your own database as part of your HRIS integration. When rendering the
  employee form, it's generally better to **populate the select options from
  your synced copy** rather than calling the referenced `link` in real time:

  * **Scale:** Some of these lists can be very large (thousands of employees,
    hundreds of positions, etc.). Fetching them on every form render is slow
    and can hit pagination limits.
  * **UX:** You can enrich the options with additional context from your own
    data (e.g. department, job title, location), provide proper search/typeahead,
    and cache them across sessions.

  Only fall back to calling the referenced `link` directly if you don't already
  have the data synced, or for small/static reference lists where the extra
  request is negligible.
</Tip>

<AccordionGroup>
  <Accordion title="Employees">
    Used for fields that reference another employee, most commonly **supervisors/managers**.

    * **Link:** `GET /v1/hris/employees`
    * **Submit:** the Kombo employee `id`
    * **Reference:** [Get employees](/hris/v1/get-employees)

    ```json Example Field theme={null}
    "manager": {
      "label": "Manager",
      "required": true,
      "unified_key": null,
      "type": "single_select",
      "options": {
        "type": "referenced",
        "link": "https://api.kombo.dev/v1/hris/employees?remote_model=employee"
      }
    }
    ```
  </Accordion>

  <Accordion title="Legal Entities">
    Used for fields that reference the legal employer / sub-company the employee should be attached to. Standard fields like `legal_entity_id` use this model.

    * **Link:** `GET /v1/hris/legal-entities`
    * **Submit:** the Kombo legal entity `id`
    * **Reference:** [Get legal entities](/hris/v1/get-legal-entities)

    ```json Example Field theme={null}
    "legalEntity": {
      "label": "Legal Entity",
      "required": true,
      "unified_key": "legal_entity_id",
      "type": "single_select",
      "options": {
        "type": "referenced",
        "link": "https://api.kombo.dev/v1/hris/legal-entities?remote_model=legal_entity"
      }
    }
    ```
  </Accordion>

  <Accordion title="Locations">
    Used for fields that reference a physical work location/site. Standard fields like `location_id` use this model.

    * **Link:** `GET /v1/hris/locations`
    * **Submit:** the Kombo location `id`
    * **Reference:** [Get locations](/hris/v1/get-locations)

    ```json Example Field theme={null}
    "workLocation": {
      "label": "Work Location",
      "required": true,
      "unified_key": "location_id",
      "type": "single_select",
      "options": {
        "type": "referenced",
        "link": "https://api.kombo.dev/v1/hris/locations?remote_model=location"
      }
    }
    ```
  </Accordion>

  <Accordion title="Groups (Departments, Teams, Cost Centers, …)">
    Used for fields that reference an organizational group such as a **department**, **team**, or **cost center**. Kombo models all of these under the unified `groups` endpoint and exposes the sub-type via the `types` query parameter.

    * **Link:** `GET /v1/hris/groups` (typically pre-filtered, e.g. `?types=DEPARTMENT`, `?types=TEAM`, or `?types=COST_CENTER`)
    * **Submit:** the Kombo group `id`
    * **Reference:** [Get groups](/hris/v1/get-groups)

    ```json Example Field theme={null}
    "department": {
      "label": "Department",
      "required": true,
      "unified_key": null,
      "type": "single_select",
      "options": {
        "type": "referenced",
        "link": "https://api.kombo.dev/v1/hris/groups?types=DEPARTMENT"
      }
    }
    ```

    <Note>
      If multiple group sub-types are relevant (e.g. the HRIS exposes both
      departments and cost centers as separate fields), you'll receive multiple
      referenced fields, each with its own pre-filtered link.
    </Note>
  </Accordion>

  <Accordion title="Staffing Entities (Positions, Requisitions, Jobs)">
    Used for fields that target a specific hiring slot the employee is being hired into. See the [Staffing entities feature page](/hris/features/staffing-entities) for a full overview of the model.

    * **Link:** `GET /v1/hris/staffing-entities` (optionally pre-filtered by `model_types` and/or `statuses`)
    * **Submit:** the Kombo staffing entity `id`
    * **Reference:** [Get staffing entities](/hris/v1/get-staffing-entities)

    ```json Example Field theme={null}
    "position": {
      "label": "Position",
      "required": true,
      "unified_key": null,
      "type": "single_select",
      "options": {
        "type": "referenced",
        "link": "https://api.kombo.dev/v1/hris/staffing-entities?model_types=POSITION&statuses=OPEN_LIMITED,OPEN_UNLIMITED"
      }
    }
    ```

    <Note>
      The pre-applied filters reflect what is meaningful for the connected HRIS
      (for example, only `OPEN_UNLIMITED` jobs, or only `REQUISITION` records).
      Use the link as returned in the schema.
    </Note>
  </Accordion>
</AccordionGroup>

## Additional Information

<Tabs>
  <Tab title="Handling Required Fields">
    * Fields marked `"required": true` must be provided.
    * Optional objects, if included, must have their required subfields completed.

    **Example Scenario:**

    If an optional object (`workLocation`) is submitted, then its required properties (like `site`) must be provided:

    ```json Example Result [expandable] theme={null}
    "workLocation": {
            "label": "Work Location",
            "required": false,
            "description": "Employee's work location",
            "unified_key": null,
            "type": "object",
            "properties": {
              "site": {
                "label": "Site",
                "required": true,
                "description": "Employee's site",
                "unified_key": null,
                "type": "single_select",
                "options": {
                  "type": "inline",
                  "entries": [
                    {
                      "id": "FXrER44xubBqA9DLgZ3PFNNx",
                      "label": "Office",
                      "remote_id": "office_001"
                    },
                    {
                      "id": "2rv75UKT2XBoQXsUb9agiTUm",
                      "label": "Warehouse",
                      "remote_id": "warehouse_001"
                    }
                  ]
                }
              }
            }
          }
    ```

    If `workLocation` isn't submitted, then the subfield requirement is bypassed.
  </Tab>

  <Tab title="Unified Keys & Values">
    Kombo uses a property called `unified_key` to standardize common fields between ATS and HRIS systems, allowing automatic data mapping.

    <div className="grid grid-cols-1 gap-4">
      <div>
        **Example:**

        * ATS provides first name data as:

          ```json Example theme={null}
          { "first_name": "Jane" }
          ```

        * Kombo automatically maps this into the HRIS's expected field.
      </div>

      <div>
        **Supported Unified Keys include:**

        ```tsx Unified Keys [expandable] theme={null}
          'first_name',
          'last_name',
          'date_of_birth',
          'gender',
          'home_address.city',
          'home_address.country',
          'home_address.state',
          'home_address.street_1',
          'home_address.street_2',
          'home_address.zip_code',
          'job_title',
          'legal_entity_id',
          'location_id',
          'mobile_phone_number',
          'nationality',
          'start_date',
          'work_email',
          'private_email',
          'yearly_salary',
        ```

        **Unified Key Values for Gender Mapping:**

        ```tsx Unified Key Values theme={null}
          'MALE',
          'FEMALE',
          'NON_BINARY',
          'NOT_SPECIFIED',
        ```
      </div>
    </div>
  </Tab>

  <Tab title="Error Handling">
    <div className="grid grid-cols-1 gap-4">
      <div>
        **Client Side:**

        Validate that all required fields are provided, validate formats (e.g., dates, numeric ranges), and provide inline validation messages.
      </div>

      <div>
        **Server Side:**

        Ensure the API returns clear error responses (400 for validation errors, 500 for server issues) and include guidance on resolving common errors.
      </div>
    </div>
  </Tab>

  <Tab title="Scopes & Permissions">
    Although **Create Employee** is a *write* feature, it often needs to *read* some information to work. Take a look at the following scenarios:

    ### Scenario 1

    The form schema includes a `manager` field that references another employee's ID.

    You may want to access the list of employees in order to render a select including the names of all employees (or better: only the managers), with their names mapped to IDs.

    ### Scenario 2

    The form schema includes a `location` field that references the company's work location.

    This requires access to the list of company locations.

    ### Scenario 3

    The form schema includes a field that references a [staffing entity](/hris/features/staffing-entities) (e.g. a position or requisition) that the employee should be hired into.

    This requires access to the list of staffing entities, which you can query via the [GET staffing entities](/hris/v1/get-staffing-entities) endpoint. The `referenced` link returned in the form schema will point to this endpoint (optionally pre-filtered by `model_types` and/or `statuses`).

    <Accordion title="Real-world example">
      [Paylocity HRIS](/hris/connectors/paylocity) allows defining the `costCenter1`, `costCenter2`, and `costCenter3` fields when creating an employee.

      Their values reference the cost centers, which are a part of Kombo's [Groups](/hris/v1/get-groups#get-groups) data model.

      In order to access them, make sure that you enable this data model in the [Scope configuration](/hris/features/scopes).
    </Accordion>

    <Tip>
      A quick way to check specifically which scopes are required/useful for create employee, is to visit the integration-specific documentation and look for **Supported Features & Coverage** → **Create Employee with Form**.

      Here are a few examples:

      * [HiBob HRIS](/hris/connectors/hibob#create-employee-with-form)
      * [Personio HRIS](/hris/connectors/personio#create-employee-with-form)
      * [UKG Pro HRIS](/hris/connectors/ukgpro#create-employee-with-form)
    </Tip>
  </Tab>
</Tabs>

## Dashboard Form Preview

The Kombo Dashboard provides a convenient way to preview the employee form for connected HRIS systems:

* **Developer Preview Tool** – Allows you to see exactly what fields you'll receive through the `GET /employees/form` endpoint.
* **Visual Reference** – Shows how the form could look when rendered in a frontend application.
* **Testing Environment** – Helps you understand where created employees will appear in the HRIS and verify field mappings.

<Accordion title="Important Notes">
  <ul>
    <li>
      **Testing Only** – The Dashboard form is intended for development and
      testing purposes, not for production use.
    </li>

    <li>
      **Access Control** – This feature is not enabled by default. Contact Kombo
      Support to have it activated on your instance.
    </li>

    <li>
      **Learning Resource** – Use it to better understand the form structure
      before implementing your own UI.
    </li>
  </ul>
</Accordion>

<Frame caption="Example: Dashboard Form Preview">
  <img src="https://mintcdn.com/kombo/wgjPsGjJZE2PEhQP/images/dashboard-form-preview.png?fit=max&auto=format&n=wgjPsGjJZE2PEhQP&q=85&s=834d76eb965db37a53d27905b0abf0d7" alt="dashboard-form-preview.png" width="2522" height="1264" data-path="images/dashboard-form-preview.png" />
</Frame>

## Summary

By implementing Kombo's Create Employee functionality, your ATS platform simplifies employee onboarding by dynamically adapting to any HRIS schema, automating data mapping, and ensuring reliable data submission.
